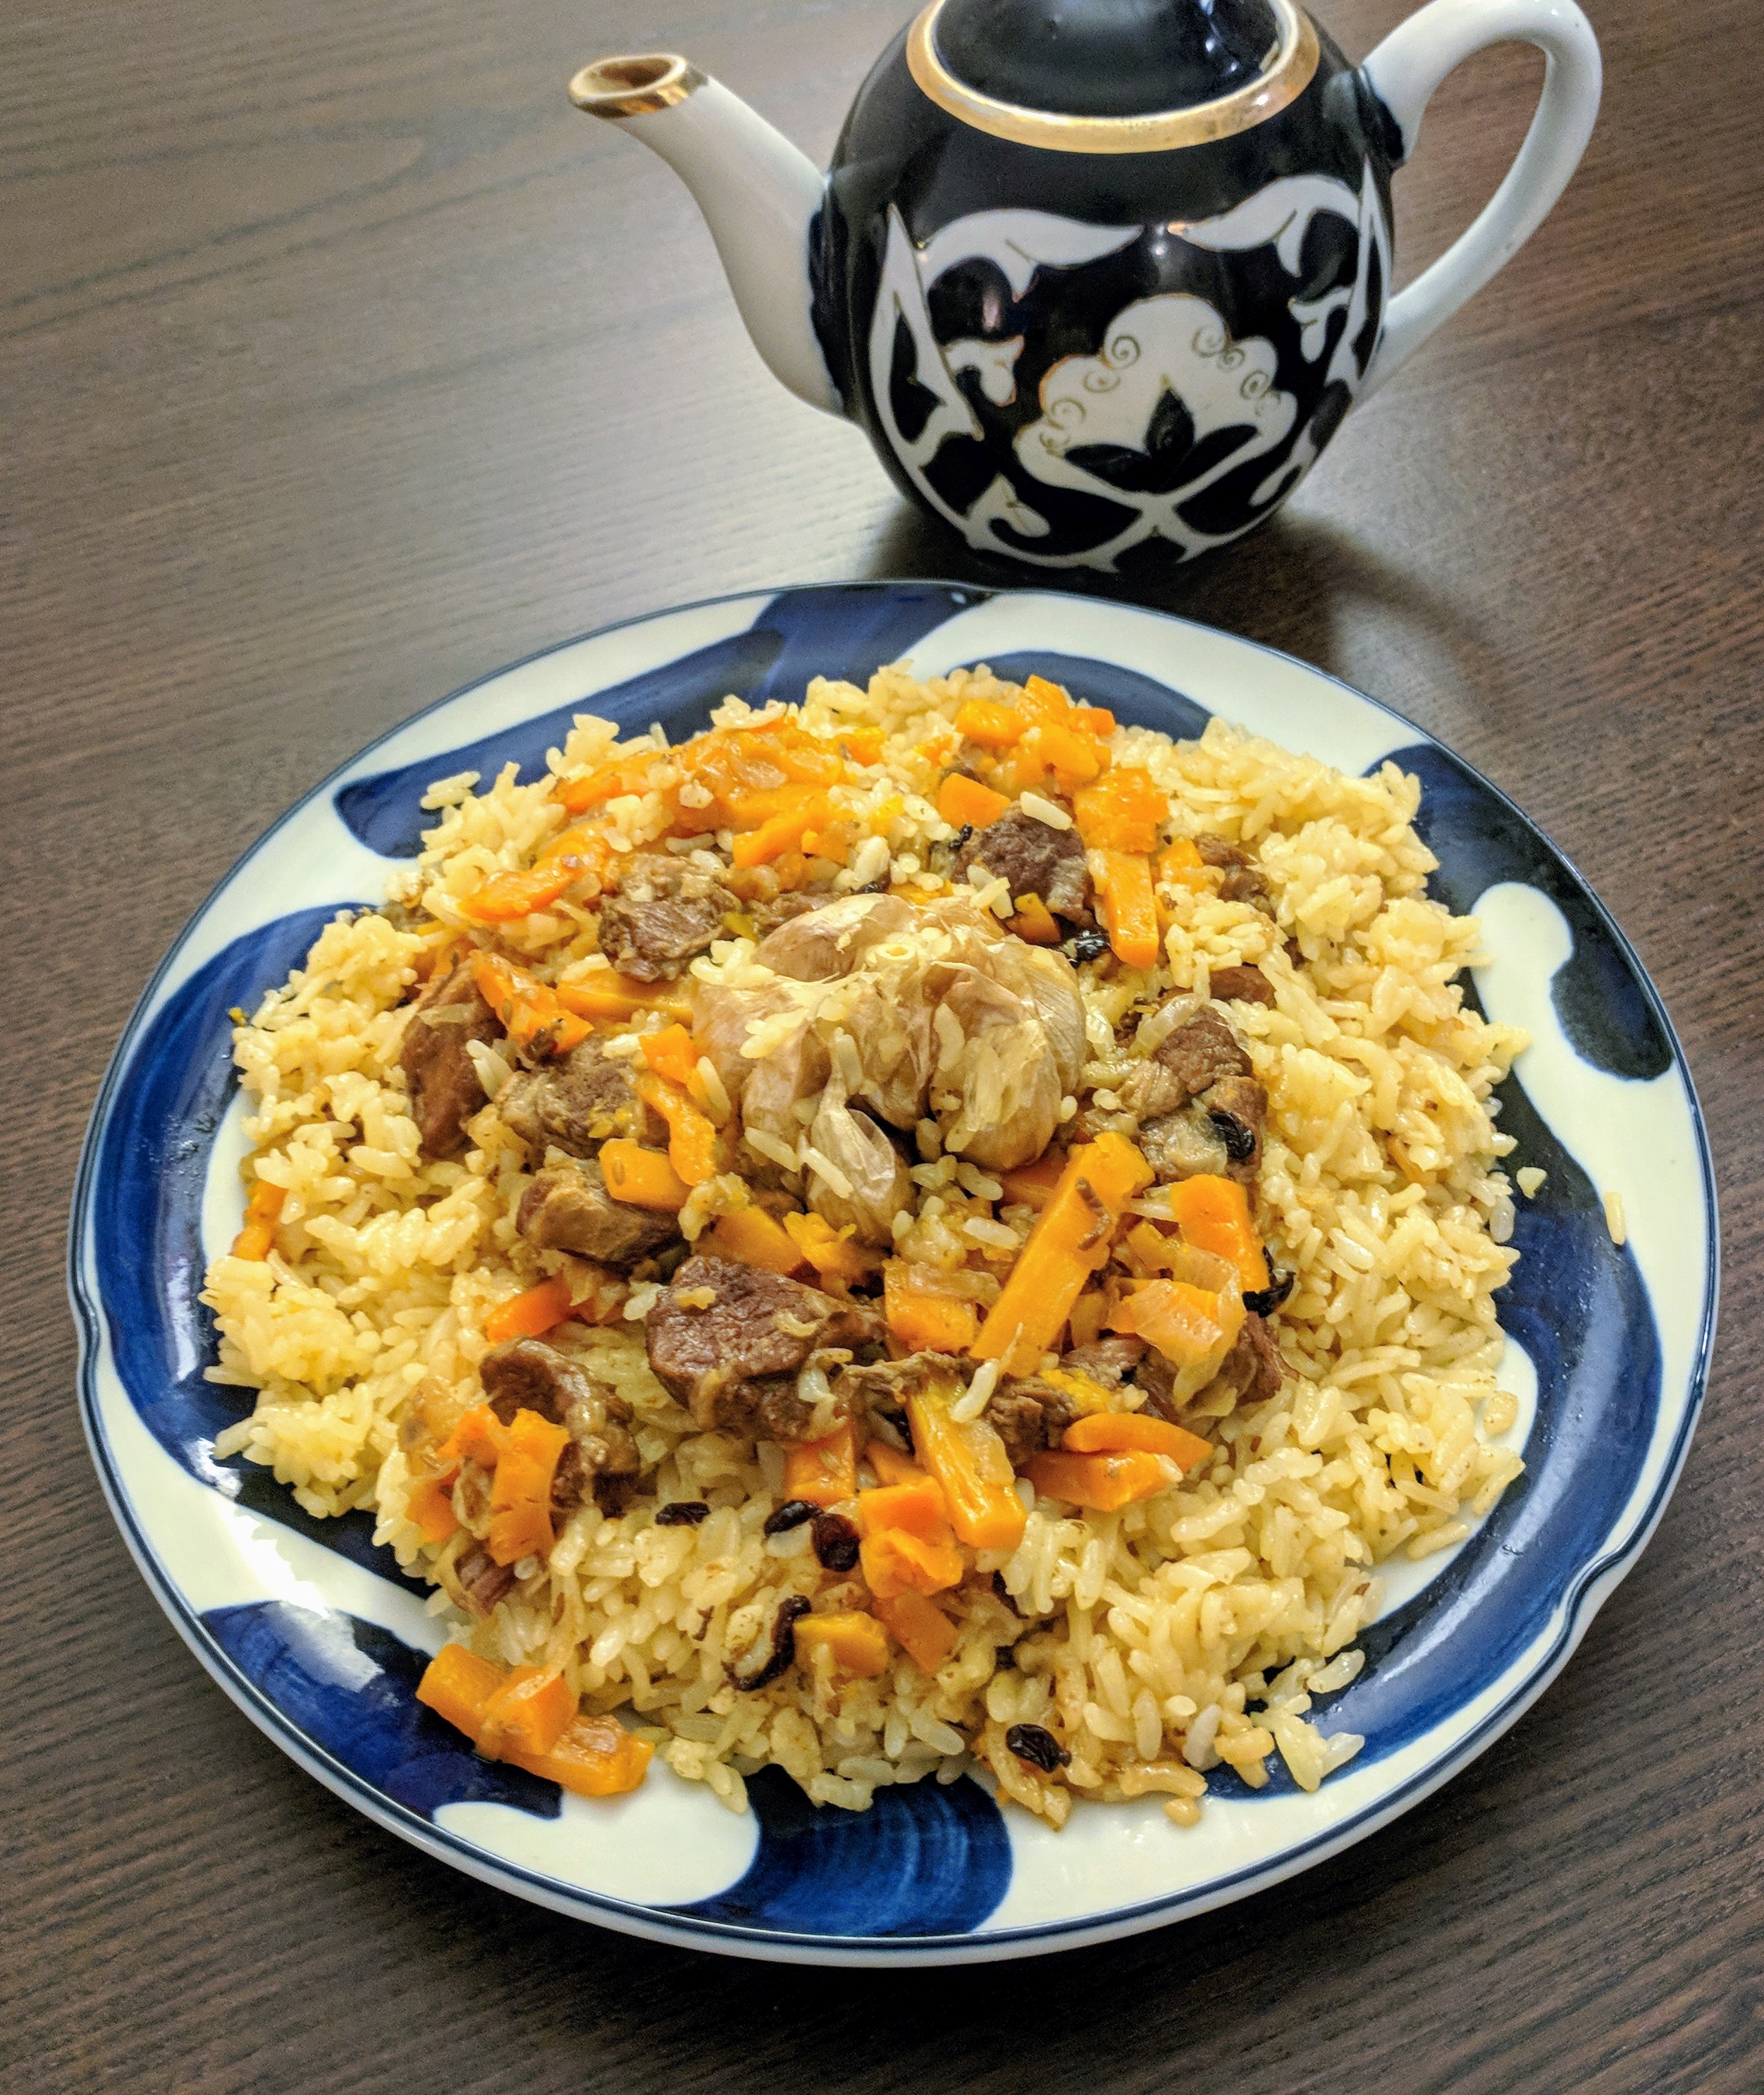
My version of Uzbek plov, cooked in an Instant Pot.
Plov in an Instant Pot instead of a kazan? Isn’t that sacrilege? Possibly. But I’ve discovered that cooking plov in an Instant Pot or electronic pressure cooker is faster, easier, tastes just as good as cooking in a kazan (dare I say it, maybe even better), and most importantly – the results are consistently repeatable!
Ingredients (4 portions) 600 mL of rice (about 500 grams) – long discussion of rice type in the original plov post, but long story short – don’t use East Asian varieties of rice, use a round, medium or long grain rice – e.g. risotto rice, paella rice, Turkish baldo rice, and in a pinch you could use basmati. I use Turkish baldo rice, (Amazon link). They also sell it at Kalustyan’s in NYC. Water – see below for amount
0.5 lb lamb meat
Small piece of lamb fat, chopped into small pieces (optional) Vegetable oil – canola or peanut (I prefer peanut, it tastes better)
3 medium-sized carrots, sliced into sticks 5-6cm long and 0.5×0.5cm thick
1 medium to large onion, sliced into half-moons
1 small onion, halved (optional) Cumin seed, roughly ground in mortar and pestle Salt Garlic head
A few dried or fresh chili peppers Barberries (optional) – they add a nice sour flavor. You can find these at Kalustyan’s.
How much water to use and how to rinse the rice The right water to rice ratio is 1:1 by volume, or 1.2:1 by weight. Make sure to account for water sticking to your rice after you rinse it. Example process:
1. Weigh the dry rice, find it is 500g
2. Rinse the rice
3. Weigh the rinsed rice, find it now weighs 700g
4. Calculate needed water = 1.2 * 500 = 600g
5. But there is 200g of water stuck on the rice, so we only need extra 400g of water. Measure this out and set aside.
Instructions
1. Put the instant pot on ‘saute’ mode and put in the lamb fat pieces. Let them fry until they have released most of their fat and only the cracklings are left. Remove the cracklings (they make a nice snack). Skip this step if you don’t have any lamb fat.
2. Pour some vegetable oil in, enough to coat the bottom of the pot (if you put enough fat in from step 1, you might not need any). Then put your small onion in, and roll it around in the oil, letting it fry until slightly brown on the outside, then remove the onion and discard it. People do this because they claim that the onion ‘absorbs’ the bad taste of the vegetable oil. I just do it for the sake of tradition, but you can probably skip it if you want.
3. Put in the onion slices and let these fry 5-10 min until they are a nice brownish color – they don’t need to be caramelized.
4. Put the meat in and fry it for a minute until it’s lightly browned on the outside – do not go overboard in cooking it since we are going to pressure cook it. It should still be raw and soft at this stage.
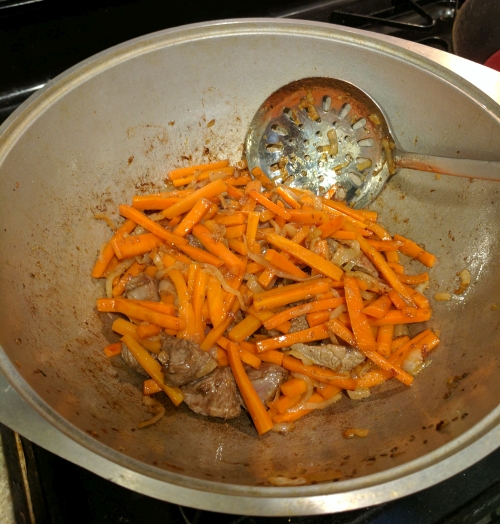
5. Put the carrots in along with a pinch or two of cumin seed and mix everything up. Cook the carrots for a while until they start to brown.
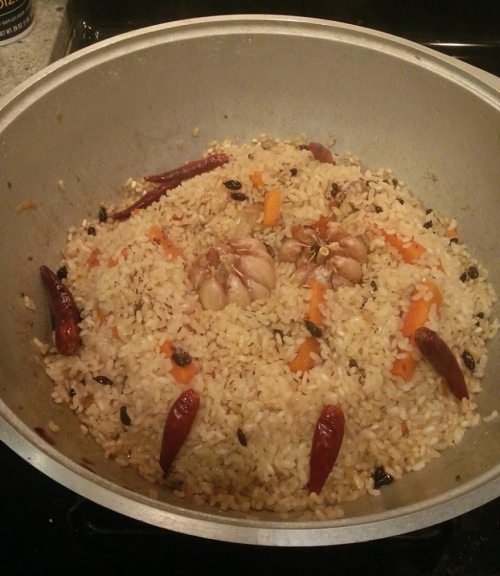
6. Pour in the water you set aside (explained above). Put a pinch or two of salt in, the chili peppers, and stir everything. Before you put the lid on, make sure nothing is sticking to the bottom of the pot. Close the instant pot lid, set the vent to ‘Seal’, and set the Meat/Stew setting for 15 minutes. You will notice a garlic in the photo, but actually it is better to put it in later (it will disintegrate if you put it in now).
7. After the 15 minutes are up, let it sit for 10 minutes. Open the lid and put the barberries in. Then quick release the pressure and place the rinsed rice in an even layer ON TOP of the other ingredients – DO NOT MIX. You want the rice layer to be as flat and even as possible. You can put in the garlic head if you didn’t in step 7 (bury it in the middle of the rice). Then again close the lid, set the vent to ‘Seal’, and set the ‘Pressure Cook’ setting for 5 minutes.
8. After the 5 minutes are up, let it sit for 10 minutes, then quick release the pressure. Fluff up the rice a bit with a fork to help the grains separate, and let the rice cool down and firm up for a bit before you plate it.
10. The plov is ready! Plate it with the rice on bottom, meat/carrots on top, and garlic in the middle. The rice grains should be individual and slightly chewy, though cooked through – ‘al dente’.
Summary: Measure out the rice by weight, and target 1.2x that much in water. Rinse the rice, weigh it, and determine the remaining amount of water needed. Keep the water aside.
1. Prepare the oil/fat
2. Saute the onions until brownish
3. Brown the meat
4. Put in the carrots and cumin
5. Put in the water, put in salt, chilis
6. Meat/stew setting for 15 minutes, release pressure after 10 minutes
7. Put rice in an even, flat layer on top, put barberries, put garlic
8. Pressure cook on high for 5 minutes, release pressure after 10 minutes
Properly cooked plov: rice grains separate from each other, not mushy
For the longest time, my plov would always turn out too sticky and mushy, and I didn’t know why. I assumed it was because I didn’t have the special rice used in Uzbekistan. Occasionally, my plov would magically turn out perfect, but I wasn’t able to replicate it. Recipes online had all sorts of conflicting information, from soaking the rice, to not soaking the rice, to adding 2cm of water on top of the rice, to adding no water at all. I experimented with all sorts of things and in the end usually just ended up with a pot of sticky rice.
But now, after two years of making plov, I have finally figured out what causes it, and how to make perfect plov every time.
Overly sticky plov is caused by cooking the rice with too much water. The correct amount of water is 1:1 in volume to the rice, PLUS the amount lost to evaporation. You cannot scale this amount up!
It’s as simple as that. All of that water you add to the pot needs to be absorbed by the rice or evaporated. Most of it will be absorbed. If you add too much water, the rice absorbs too much, and it becomes sticky and mushy. Critically, if you cook with the same cooking setup, about the same amount of water gets evaporated, regardless of how much rice you cook. That means you cannot scale the water amounts!
Close up of the kazan with a properly cooked plov. The grains are individual, cooked through to “al dente”, and not sticking together. The rice is not basmati and it is not parboiled.
Ironically, most plov recipes seem to be rather vague about how much water is needed, usually suggesting you add 1-2cm of water (or “up to the first knuckle”) on top of the rice. Adding that much water is most likely going to lead to mushy rice unless you are cooking with the exact same setup as the person recommending it (that method leads to mushy rice for me). In fact, when you watch videos of professional plov makers, it usually looks like they are pushing around a big layer of dry rice on top (it isn’t dry, they are raking it back and forth so all the rice cooks evenly). If they put 2cm of water over their rice they would end up with a giant vat of mush! Personally, when I put the rice in, it looks like the water is just barely covering it – but again, this will vary depending on your setup.
Further complicating things is the issue of whether the rice should be soaked or not. Some claim that this can remove more starch and make the rice less sticky. After going through a long period of soaking the rice, I have decided it is best not to soak the rice. Your rice is going to absorb some amount of water depending on how long it soaks, how absorbent the rice is, and ambient conditions. If it absorbs more, you need to add less water later, and vice versa. Since it’s difficult to know how much the rice absorbs, this adds a layer of uncertainty. It is very easy to add too much water, ending up in a ruined, overly sticky plov. If you do not soak, you can control exactly how much water goes into your rice. You can achieve a perfect plov texture without any soaking. It’s best just to avoid this potentially plov-ruining step.
Step by step, here is how to ensure the right water amount. 1. Determine the correct amount of water to use. You need to use 1:1 in volume of water to volume of rice, plus the amount lost to evaporation. The amount lost to evaporation depends on the rice used and your cooking setup, and honestly, is determined by trial and error – but err on the side of too little water. In making plov, the only times you really need to worry about water evaporating are 1) when you boil the water to make zirvak – which you then turn down to a simmer, so little water is lost and 2) when you boil the water to cook the rice. Some types of rice take longer to cook than others, meaning more water will be evaporated. If you use a wide, flat pan, you will lose more to evaporation than if you use a deep, round pan. If you soak your rice (which I don’t recommend doing), it will cook and absorb so quickly that very little is lost to evaporation, so you need to add almost no water at all. To complicate things, keep in mind the other ingredients in the pot (e.g. carrots, meat, onions) also give off water, so you might even need less than 1:1 in certain circumstances!
For me, using a flat-bottomed round kazan on a gas stove with calasparra rice, I lose very little to evaporation, so I add only 1/2 cup of water. In other words, if I am cooking enough rice to fill a 1L jar, I put 1 liter of water plus 1/2 cup of water (so ~1.1L). If I decided to cook 2 jars of rice, then I would use 2 liters of water…plus 1/2 cup of water (so ~2.1L). If I decided to cook 1/2 a jar of rice, I would use 1/2 liter of water…plus 1/2 cup of water (so 0.6L).
Calasparra rice I use for plov.
2. Do not soak your rice. As stated above, this introduces uncertainty because we don’t know how much gets soaked up. You could, in theory, weigh the unsoaked and soaked rice, figure out how much is soaked up, then soak your rice in the exact same way each time, but I just don’t see the point. Plov tastes perfectly good without soaking.
3. Measure exactly the right amount of water, and add all of the water in the broth stage. Eyeballing it is not going to work reliably, unless you always cook with the exact same amounts of ingredients every time. I eyeball basically everything in cooking, but this is the one thing I do not.
4. Do not add any extra water during the rice cooking stage. Only add water if your rice is too hard (literally can’t chew through it) and there is no water left in the pot. By not soaking and not adding any additional water later, we have controlled the maximum amount of water our rice can absorb.
Oftentimes, when you taste the rice after the water is absorbed, it still tastes very crunchy and uncooked. It is very tempting to add more water and cook it a bit longer but this is a no-no; I have ruined many perfectly good pots of plov this way. As long as the rice has swollen to its correct size and you can bite through it (however crunchy), then all you need to do is steam it and you will have perfectly cooked rice.
This is what it looks like when I put the rice in for cooking. No additional water is added.
The water to rice ratio is the number one determinant in whether the plov will be sticky/mushy or not. But here are a few other things to consider:
Pick a rice type and stick with it – Some variants of rice are more prone to stickiness than others. East Asian rice is simply unworkable no matter how careful you are with water ratios, as it is naturally sticky and starchy. Risotto rice tends to be sticky/creamy. Basmati rice tends to be un-sticky, but isn’t really the correct shape or texture. I have been happiest with Turkish baldo rice. The important thing is to pick one type of rice, learn exactly how to cook it, and stick with it. When you switch rice types, you are apt to screw up the plov.
Wash the rice – Don’t soak the rice, but just before adding it in, you need to wash it – run the faucet over it, mix it around with your fingers, and pour out the cloudy water. Repeat until the water is nearly clear (you won’t get it perfectly clear). Then add directly into the broth. This gets the starch off the rice, helping it to be less sticky.
Rice steaming time is important too – It is slightly less important than the critical water amount, but still important for perfection.
The amount of time you steam the rice is something of an art. Too little, and the rice is undercooked. Too much, and even if you have the right amount of water, the rice can be overcooked and stick together. Guidelines: if your rice is nearly done before steaming, steam 20 minutes. If your rice is still very crunchy, steam 30 minutes.
Today’s post is all about how to make fluffy basmati rice like you may have tried in Indian or Persian restaurants. This style of rice cooking is used to make plov/chelow/polow/pulao in Iran, Azerbaijan, and the Indian subcontinent. Unlike the method used for Uzbek plov where the rice is cooked together with other ingredients and absorbs the broth, in the “drain and steam” method, the rice is cooked by itself, drained, then steamed. This ensures fluffy rice and individual grains that don’t stick to each other. We’ll go over specific recipes with this rice, like Hyderabadi biryani or Azeri plov, in another post.
Azeri style plov with kazmakh (Persians call it ‘tah-dig’) – the crispy rice at the bottom of the pot.
For a long time, I would buy basmati rice in the store, cook it, and find it tasted nothing like the fluffy rice in Indian restaurants. The secret to making perfectly fluffy basmati rice is 1) using a high quality rice, 2) draining and 3) steaming.
Importantly, a rice cooker will NOT make fluffy basmati rice! Rice cookers are pretty much only for making Asian varieties of rice which are eaten somewhat sticky. If you use a rice cooker to make basmati rice, it will probably come out kind of sticky or mushy, and it won’t resemble the rice in Indian restaurants.
Secondly, sometimes people recommend the “absorption” technique where you boil the rice in the correct amount of water then cover it and let it “absorb” the water and steam until fully cooked. That method works fine only if you cook the exact same type of rice and the exact same amount of rice every time under the exact same conditions, and is best only for cooking small amounts. It is highly prone to error and can result in overcooked or undercooked rice if you get the amount of water wrong. To achieve perfectly fluffy rice every time for any amount of rice, use the drain and steam method explained below. However, sometimes a recipe will call for the absorption method because the rice is being flavored by the broth (e.g. Saudi kabsa). We’ll address the fine points of that method in a later post.
Regular basmati rice.“Sella” basmati rice. Notice how it is a bit yellowish and translucent.
I use two types of basmati rice: the regular kind (e.g. Tilda brand) and the “sella” (sometimes called “sela”) kind. Regular basmati rice is the best type to eat plain with curries, and has a nice aroma to it – but it is rather delicate and the grains can break easily, so you must be very careful with it when cooking. “Sella” rice is good to use for biryanis. It is parboiled, giving it a yellowish translucent color, and making it very resilient and non-sticky. It is nearly impossible to cook it wrong. The downside of “sella” rice is that it does not absorb flavors that well and is a bit rubbery tasting compared to the delicate regular basmati rice. If you have never cooked rice like this before, I recommend starting with “sella” as it is a bit more forgiving. Kalustyan’s in NYC sells both varieties.
Whatever kind you buy, make sure it is a high quality brand, rather than a generic “basmati” rice you find in the store.
Process:
1)Wash your basmati rice several times until the water runs clear. Then soak the rice for 20-30 minutes. Drain the rice after you are done soaking it.
2)Pour water over the rice until 2-3 inches of water cover the rice. Add salt and oil to taste. If you are making Indian style rice, you can put in cardamom, bay leaf, and other whole spices as you like. Set this on high heat until you get a rolling boil.
3)Let the rice cook in the boiling water for a few minutes, sampling a rice grain every now and then. The rice needs to taste 70-80% done – a bit crunchy, but nearly edible.
4)Quickly, drain the rice in a colander. Do not let it sit in the colander long, otherwise it will start to clump up!
For Azeri or Persian rice, you may want to make a kazmakh(Azeri) or tah-dig(Persian) – the rice that turns crispy from touching the pot. Getting this right will involve trial and error and most likely it will just stick to the pot without coming off cleanly. Mix some yogurt and egg in a bowl, and add some of the mixed rice. The mixture should be mostly rice, and not too liquid.
You can also make a saffron infusion to add color and flavor (if you just want the yellow color, turmeric will give the same effect and is much cheaper). Just grind up some saffron stalks and mix with hot water.
5)Now we start the steaming phase, but don’t turn the heat on for now. Ready an empty pot – a kazan works best if you have one, but just use a regular pot otherwise (don’t use a wok!). If you made a kazmakh or tah-dig, spread it in a layer over the bottom of your pot. Then put the drained rice into the pot, and form it into a mountain. If making Azeri or Persian rice, you can drizzle some saffron-infused water over it.
6)Now you need to bundle up your pot so the steam can stay inside. Put clean cloth towels between the lid and the pot, and close tightly (paper towels can do in a pinch if you don’t have any towels lying about). Weigh down the lid with a bowl or other heavy object – we don’t want any steam to escape.
7)Now turn the heat to medium and let the rice pot warm up for about 5 minutes. Then turn this to minimum heat, and let it steam for at least 20 minutes, ideally 30 minutes or even longer. More steaming = fluffier rice.
8)If making Azeri rice, you can open up the pot after 15-20 minutes, put a big slab of butter in the middle of your mountain, then wrap it up again and let it steam for another 20-30 minutes.
9)When you are done steaming, turn off the heat and let it sit covered for another 5 minutes. Then open the lid (being careful not to burn yourself on the escaping steam) and fluff up the rice a bit with a fork. Let it sit uncovered for another few minutes so the rice can cool down and firm up. For Indian rice, you may want to add a touch more oil after the rice is done cooking and mix well. If you made a kazmakh/tah-dig, pry it out with a knife and serve it with the rice.
I first ate plov (плов) in a small canteen in Turpan, an oasis city in the deserts northeast of the Tarim Basin. Uyghurs call it “polo”, and restaurants in Xinjiang make it in gigantic kazans outside, dishing it out as ordered and topping it with a hunk of fatty lamb meat. It was one of my first tastes of Central Asian cuisine, and incidentally the first dish I started cooking with. I’ve learned a lot about making plov since my first post on it over a year ago; this is a complete re-do of the old recipe with new photos.
Cooking plov in Turpan, XinjiangPlov preparation step by step.
Plov could be considered a pan-Asian dish; whether Uzbek plov, Uyghur polo, Indian pulao, Afghan palaw, Iranian polow, or Turkish pilaf, the basic idea is the same: rice and oil. The recipe I present here is for Uzbek plov (specifically, Fergana style), which tastes very similar to Uyghur polo, and is the most common type of plov in restaurants outside of Central Asia. Uzbekistan is the spiritual “homeland” of plov with many different regional varieties.
Plov in Bukhara
How should plov taste? In the ideal Uzbek plov, the rice grains should be separate, maintain their form, and not stick together. The rice should be tender, yet firm: a good plov is not mushy and sticky like porridge, nor is it creamy like a risotto. The closest equivalent in European cuisine is probably paella.
Plov should be rather oily, and after eating there should be a layer of oil left on the plate. The meat for plov should be tender lamb meat. The carrots should be in big chunks, soft and sweet, having been caramelized during the cooking. Overall, the plov should have a nice balance of tastes between savory/lamb meat, salty, oily, cumin, and sweet (onion & carrot).
Plov served in a chaikhana in Bukhara.
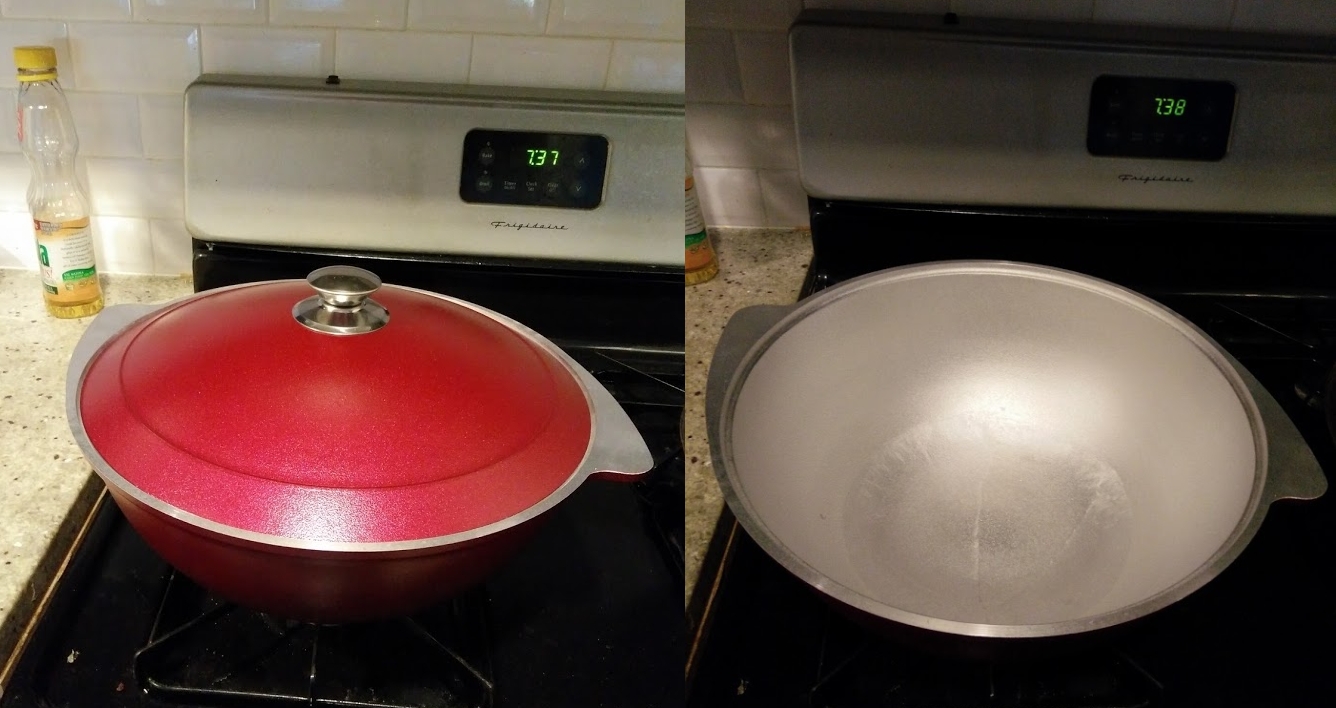
Cooking utensils It is best to make plov in a kazan. In the past, I made plov in a cast iron wok (and you can see this in many of the photos), but your plov will turn out much better in a kazan. It’s very easy to mess up plov, especially if you use the wrong cooking vessel. Read this post to learn what kazans are and where you can buy one.
My kazan
Making plov is a journey that will probably require many, many tries and many soggy, mushy, burnt, or not-cooked-enough plovs. I have been making it for over two years and every time I make it, I still find some way to hone my technique.
There are many plov video recipes on the net, but the most simple, straightforward one I have found is this one (in Russian).
Ingredients:
IMPORTANT! Unlike most of my other recipes, the proportions (critically, that of water to rice) are extremely important in plov. Incorrect proportions can ruin the dish. This recipe serves 4-5 people.
0.5 kg rice: The choice of rice has a huge effect on the finished product, as much so as your cooking. I recommend Turkish baldo rice paella riceas it is the most similar in size, shape, and texture to the rice used in Uzbekistan. Spanish calasparra rice (used in paella)is another good choice. Risotto rice can also work, but can be on the sticky/creamy side. Basmati will work, but only the parboiled kind (“sela” rice), and it isn’t at all like Uzbek rice. East Asian rice will not work because it is too sticky.
In plov, it’s very important that the cooked rice grains stay separate and not a sticky mush. The Russian term for this desired consistency is “рассыпчатый.”For this reason, it’s basically impossible to obtain a good result with East Asian rice, which by design is supposed to stick together.
Basmati is often used to make plov outside Central Asia, but in texture and shape it is really quite different from the rice in Uzbek plov. On the plus side, it tends not to stick together, making it a good choice for a beginning cook. Look at the difference in these two pictures below. On the other hand, in northern Afghanistan they have their own “Uzbeki pulao” which seems to be made using basmati rice. They use a special, parboiled type of basmati rice called sela rice which holds its shape and tends not to stick together or get mushy, unless you really drown it in water.
On the left: Uzbek plov using calasparra rice. On the right: Persian style palaw using basmati rice. The rice texture is totally different.Plov in Samarkand. Notice the rice is medium grain and plump, not at all like basmati.
So to summarize, here are my criteria for correctly cooked plov rice:
1) Uses medium grain rice, not basmati, not parboiled
2) Rice grains “al dente”, a bit of chew
3) Rice grains not mushy/sticky/creamy; grains should be individually defined and separate easily when you fluff or toss the rice.
Close up of the kazan with a properly cooked plov. The grains are individual, cooked through to “al dente”, and not sticking together. The rice is not basmati and it is not parboiled.
Rice to water proportions: This is really important in making plov with the correct texture, and for whatever reason seems to be completely overlooked in almost all recipes. I am all for eyeballing things but this is the one time you need to be crazy precise in measuring, unless you want a pot full of soggy mush. Essentially, you need 1:1 in volume of water to rice (or 1.2:1 in weight of water to rice), minus the amount that sticks to the rice after you rinse it plus the amount of water lost to evaporation (which is usually about 1/2 cup, and does not scale). This will vary depending on your cooking setup and the type of rice you use (since different rice varieties can take longer to cook).
Rinsing the rice and measuring the water: First, measure the dry rice (say we use 500 grams). Rinse the rice in a pot, pouring out the cloudy water until it becomes clear. Now measure the weight of the rinsed rice. It might go up to 700 grams (meaning there is 200 grams of water stuck to the rice). But we only need 500 * 1.2 = 600 grams of water, so we only need an extra (600 – 200) = 400 grams of water. Measure out the 400 grams of water. Then, add in the water needed for evaporation – 125mL. Keep the rinsed rice and the pre-measured water aside.
0.5kg lamb meat – I have used lamb shoulder chops and lamb leg, all work fine for plov. Pre-measured water – see above 2 medium onions 3 large carrots Cumin seed – You need the whole seeds – cumin powder is a poor substitute. Grind a few good spoonfuls of cumin seed with a mortar and pestle – it doesn’t need to be a powder, just lightly ground is fine. 2 garlic heads
Dried chilies or fresh chili peppers – not that many, maybe 5-6 small ones or 1-3 big ones. Can be omitted. Salt Vegetable oil and/or lamb tail fat
Barberries or raisins (optional) – barberries can add some nice acidity to the dish. I typically don’t like raisins in plov (too sweet), but some do.
Directions (takes about 3 hours start to finish)
1. Cut the onions into slices (half moons).
2. Cut the carrots into big sticks. You want fairly big pieces, maybe ~2 inches long and 1/4 inch thick. While it may seem like a lot of carrots, keep in mind they will shrink dramatically during cooking. Generally err on the side of too much carrot. I don’t think I’ve ever had a plov with too much carrot, but I’ve certainly noticed when there is too little.
3. Debone and cut up the lamb meat. Cut out the fat and bones, and keep aside. Chop the lamb meat into medium sized pieces.
4. Heat up the kazan and heat the oil. Put the kazan on high heat. Once the kazan is hot, add vegetable oil to cover the bottom in a fairly deep layer, and wait a bit until the oil heats up.
You should have at least this much oil in your kazan, maybe even more!
If you are lucky enough to have lamb tail fat (курдючный жир, kurdyuchniy zhir) then instead of oil, you can cut the fat into slices and melt them into oil. The resulting fat crisps make a tasty snack. Remove the crisps. Lamb tail fat is a luxurious rarity for me here in NYC, so I usually melt the fat pieces into oil, then add vegetable oil. I buy it at the Fortuna grocery in Brooklyn.
Lamb tail fat starting to cook.
5. Prepare the oil. If you are using vegetable oil, take a small onion, remove the skin, and fry it in the oil, letting it cook on all sides until the whole thing is brown, then remove the onion and discard it. While vegetable oil in small amounts lacks any discernible taste, the amount we are using means you are going to notice its flavor. Vegetable oil has a weird taste to it, and putting the onion in helps absorb the weird flavors and replace them with onion-y flavors. If you really can’t bear to use up the extra onion, you can skip this step, but your plov might taste off.
6. Fry the fat and bones and meaty bone pieces. Fry these pieces until they get to a nice golden-brown and you smell the aroma of lamb fat. Then remove them and keep the meat and bones aside (you can discard the fat pieces). This will help to further flavor our oil.
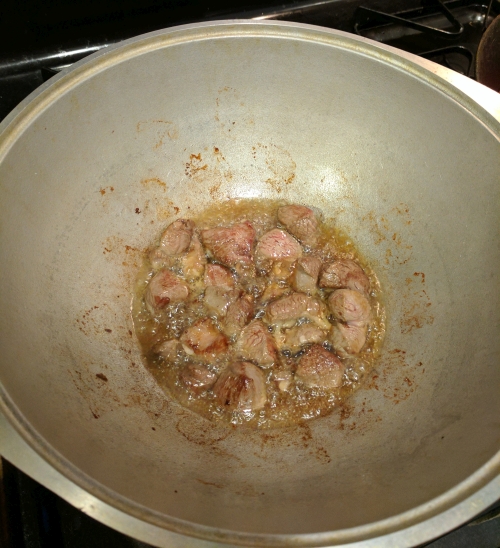
7. Fry the meat. Fry until it develops a nice golden brown around the edges, then remove it and set aside so it doesn’t overcook during the next steps.
8. Fry the onions until they are a light brown color. They don’t need to be fully caramelized, just a little brown around the edges is fine.
9. Put in the carrots and add about 3/4 of the prepared cumin seed. Fry for 15 minutes until the carrots are soft. Cook them as long as you need to until you can easily pierce them with a fork. Then add the meat back in and fry everything together for a minute or so.
10. Make the broth. Take the measured water and pour it over everything. Put the bones back in. Put in the garlic heads and the chilies. Add raisins and/or barberries if you are using them. When the water boils, turn it to low heat, and let it simmer for at least 40 minutes to 1 hour, uncovered. This broth is called “zirvak.”
11. Remove the bones, garlic, and chilies, and salt the broth. If any of your bone pieces have a good amount of meat on them, save them for later. Keep the garlic and chilies aside. Salt the broth and taste – it should be very salty. Remember, you are going to add rice in, which will absorb the broth.
12. Add the rinsed rice in. Then carefully add the rice in a layer on top of the other ingredients (do not mix it). Carefully smooth out the rice into an even layer.
All of the water we see in the pot needs to be absorbed by the rice (some will evaporate, but the majority will go into the rice). This is why the measurement in the last stage is so critical. If we added too much water, the rice will be forced to absorb too much, and become soggy and mushy.
This is what it looks like after I put in the rice. I don’t add any additional water.
13. Cook the rice. Turn the heat as high as possible. There should be big bubbles bursting all over the top of the rice. Rake the rice back and forth, slowly flipping the top layer to the bottom so that all the rice can get cooked evenly.
14. Let the water boil off. As the water boils, it should drop below the top of the rice. We want the water to be completely gone.
At this point, the rice should have absorbed the water, but not be “done.” In other words, the rice should have grown to its full size and “look” done, but it should still be crunchy and undercooked when you bite into it. If you can chew through the rice, do NOT add more water! I have ruined many perfectly good pots of plov thinking that the rice needed more water. It does not. Steaming will take care of it.
However, it should not be so hard that you cannot chew through it. If the rice is too hard to chew through, add a tiny bit more water as necessary and cook until you can chew through it. Otherwise, turn the heat down to medium and let the rest of the water boil off.
As the water drops, make holes in the rice to help the water escape more quickly. Check the holes and the sides of the kazan for any water remaining – keep in mind oil will always be at the bottom, don’t burn the stuff at the bottom thinking the oil is water and trying to boil it off. When the water is gone, turn the heat back down to minimum.
15. Steam the rice. Make a small “hill” of rice, and top with the rest of the cumin. Push the garlics and chilies and any hunks of meat on the bone into the top of the rice layer. Make some holes in the mountain to help the steam circulate. Cover the kazan. Make sure that the cover is tight and no steam at all escapes – wrap the lid with towels for a tighter seal and weigh it down with something (I use a bowl). After a minute or so, the cover should be hot to the touch. This final steaming stage is going to turn our plov rice from “crunchy” to “done” and give it that wonderful fluffiness that we desire.
After the cover is hot, turn the heat down to low, and let this steam. The exact time is something of an art, and depends on how done the rice was in the previous stage, and the type of rice you use. If the rice tasted very crunchy and un-done, let it steam for longer: 30 minutes. If the rice tasted almost done, then steam it for less: 20 minutes.
16. Finished! Take off the lid, and remove the garlic and chilies and bone pieces. If the rice is still undercooked, then you can steam it for longer (re-cover it, heat up to medium until the pot is hot again, then turn down to low heat again). It might only be the top layer that is undercooked, in which case just mix it well and steam until the rice is done.
Scoop up the rice and gently shake it back into the pot, to help the rice grains separate from each other. Carefully mix the meat and carrots on bottom with the rice, being careful not to mush the rice together. Plate the finished plov and garnish with the garlic and chilies and meaty bone pieces.
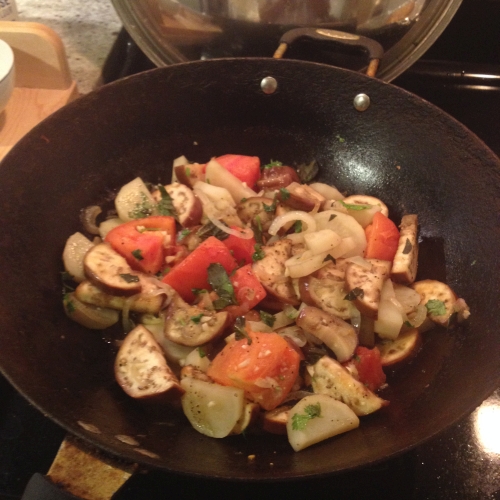
Serving: Plov is often served with a salad of sliced tomatoes and onions called “achik chuchuk.” Just mix sliced tomatoes and onions with salt and a dash of pepper. Sliced cucumber and hot pepper is often added as well, and I like putting in a splash of white vinegar. You can add some greens like mint or cilantro or dill if you like. Traditionally, people drink hot green tea with plov (and in general any greasy dish).
Common mistakes:
Rice became a sticky mush / overcooked – This happens if you use too much water and unfortunately by the time you realize it, the rice is pretty much ruined. It’s critical to err on using too little water, and add as needed.
Rice unevenly cooked after steaming / rice on top too hard, rice on bottom too soft
This happens if the cover is not tight (steam escaped), or you are using a wok or regular pot instead of a kazan (because the thin-walled wok is poor at retaining heat and keeping the top warm where the rice is). In this case, you can flip the rice on top onto the bottom, mix everything up, then steam it for a bit longer.
Tasteless/not salty enough – Besides the obvious culprit of not salting the broth enough, this can happen if you don’t brown the onions enough.
Rice burns at bottom – this happens if you aren’t careful about keeping the rice in a layer at the top.
Meat burns at bottom – Usually happens if you cook the rice for too long during the final steps when all the water is gone. It is also very easy for the food on the bottom to burn if you use a wok or a flat-bottomed pan to cook plov instead of a kazan.
Soman is my absolute favorite Uyghur food. I have never been able to find it outside of China, and today I made it for the first time. It’s been nine years since I’ve eaten it!
Soman goes by a few names – sometimes just “soman”, sometimes “din din soman”, in Central Asia “дын-дын цомян”, and in Chinese 丁丁炒面(ding ding chao mian – literally “stir fried noodle cubes”). It’s essentially the same dish as lagman (recipe here), but the noodles are chopped up into little cubes before cooking. You get lots and lots of little noodle pieces that you can pick up and eat with a spoon – the closest analogue in Western cuisine is the German spaetzle. Despite being similar to lagman, it’s really a completely different eating experience!
Soman, as served in a small cafe in Niya/Minfeng on the edge of the Taklamakan desert.
As with lagman, the dish can be served in a stew, or stir fried with the toppings. This recipe is for the stew version, but the stir fried one is simple – just put less water in your sauce, then add the soman noodles after cooking and stir fry everything for a bit.
How to make the soman
The general process I follow is: 1) make the dough and rest it 2) do all the prep for the lagman 3) coil the dough into noodles 4) cook the lagman sauce and let simmer 5) chop up the noodles and cook them 6) serve.
The magic noodle coil…those who don’t coil their noodles, will not make a good lagman.
The first few steps are exactly the same as in the laghman recipe. My only extra tip is to make sure your dough is not too dry, and that you don’t leave it out for too long. Soman is usually a bit thicker than lagman, and if it dries out, it’s possible for the center to not cook through.
1) After coiling the noodles, brush them well with oil and put them in the fridge for a bit. When you are ready to chop the noodles, start uncoiling the dough pieces and stretch each one out into a basic noodle shape. With soman, you don’t have to be as careful about making your noodles uniformly round & thin like lagman. Using a knife, start chopping the dough into little cubes. Pile the cubes up on an oiled plate.
Chopping the noodles can take much longer than it seems. Try not to pile too many noodle cubes onto one plate, and put the plates into the fridge when full. Otherwise, the noodle pieces can end up sticking and melting together if you leave them for too long.
2) Boil a pot of water and pour all your noodle pieces in! You may find that the noodle pieces have ended up sticking together and to the plate in one big mass of dough. Don’t fret – if you oiled them enough in the coiling stage, they should come apart in the boiling water. Use chopsticks to poke around in the noodles and make sure they separate and don’t stick to the bottom.
3) After the water returns to a rolling boil for a few minutes, try the noodles. They should be al dente. Quickly remove all the noodles, place in a sieve, and briefly rinse in cold water and toss.
How to make the stew
The stew is the same as in the lagman recipe, but make sure you chop every ingredient (meat, vegetables) into a cube shape. The whole idea behind this dish is that everything is chopped up so you can eat it with a spoon.
When the stew is done, plate the soman noodles and generously ladle the stew over it, making sure each plate has a good amount of sauce. Mix everything together in the plate a bit. Enjoy!
This recipe is for the Uzbek bread, obi non, or in Russian “lepyoshka“, but you will see various breads that look very similar to this all over Central Asia – round, and pressed down in the middle, almost like a giant bagel or pizza crust. In Central Asia, bread is such a basic staple food that you get it with literally every meal, without asking for it. If you visit someone’s house, they will bring you bread and tea.
Beautiful bread bought at the Siyob bazaar in Samarkand.
This is a versatile bread and tastes great just eaten by itself, fresh out of the oven. It’s also great to eat with soups and stews, or with jam. It’s most similar to a baguette in taste and texture. This bread is pretty similar to the Uyghur version I wrote about earlier. The difference is that it is much thicker and the pressed down part in the middle is smaller. If the Uyghur nan bread is like a big pizza crust without any sauce on it, the Uzbek nan bread is like a giant inflated bagel.
Bread served at a restaurant in Bukhara.
Making bread is truly an art – don’t be surprised if it doesn’t turn out right the first few times you make it. I had to make this bread 20+ times before it turned out the way I like it, and I’m still trying to perfect my technique.
Bread, tea, and salad at a Khiva restaurant.
In Central Asia this bread is made in an oven called “tandyr”(similar concept to a tandoor oven), slapping the dough directly onto the oven walls, as you can see in the video below. I obviously can’t replicate that at home, but I’ve gotten good results with a pizza stone. Failing that, it would probably turn out OK on a baking pan.
I use some bread stamps I bought in Uzbekistan to make the patterns on the bread. They are called “chekich”; you can see the bakers in that video stamping the dough with them in the beginning. You can buy them from this store on Etsy, or if you know someone traveling to Central Asia, ask them to buy a couple for you – they only cost a few dollars and should be sold in almost any bazaar. In New York, you can buy bread stamps at Fortuna grocery in Brooklyn – they sell small wooden ones behind the checkout counter, along with plates and teapots. If you don’t have a chekich, you can just use a fork.
Ingredients
Flour
Dry yeast
Salt
Sugar
Milk and/or lukewarm water. Milk makes the bread softer. Ratio of flour to liquid: by volume, 3:1. By weight: 1.5:1.
Egg (optional) – to glaze the bread
Toppings for the bread – sesame seeds, nigella seeds, finely minced onion, garlic
Directions
Make a pile of flour with an indentation in the middle. Put your milk and warm water in the middle. Put in half a packet of dry yeast, a teaspoon of sugar, a teaspoon of salt, and a pinch of flour. Then stir up the middle and wait for a few minutes until it bubbles up and turns into a foam.
Mix the water into the flour. When it is solid enough to work with your hands, flour a clean surface and start kneading the dough, adding more flour as required if it gets sticky. Knead this for 10 minutes until it no longer sticks to your hands and is relatively firm and pliable.
Put this in a bowl and let it rest for 40 minutes in a warm place, covered with a clean cloth.
After the 40 minutes are up, the dough should have risen. Take out the dough and knead it again for a few minutes, then shape it into a fat disc and let it rest for another 15 minutes, covered.
After the 15 minutes are up, take the dough and roll it out into a big circle, not too thin. Then use your fingers to press down the middle of the dough, pushing the air outwards. Don’t make the middle too thin. Use your fingertips to press a circular ring into the middle of the dough. You really want to define a nice circular edge, it’s not so important to press the middle down. Let this rest for another 5 minutes.
Press all the way around your circular indent again. Now use a bread stamp to press down the middle and make nice patterns. The patterns aren’t just to be pretty, the holes help prevent the middle from rising, giving us that nice giant doughnut shape we want. If you don’t have a stamp, you can just use a fork to make holes all around the center. Whether you use a stamp or fork, make sure to press down hard so the holes go all the way through the dough.
Use a brush to cover the bread with a mixture of beaten egg and milk. This will give the bread a nice shiny golden brown crust when it’s done, and also make it sticky so our toppings won’t fall off. If you don’t have egg, you can use just milk to glaze the bread, or failing that, water. The point is to wet the bread – the choice of egg or milk or water just has different effects on the finished appearance. Whatever you do, just glazing the top and sides is fine – don’t glaze the very bottom because it can end up getting stuck to the peel. Then add your toppings – I usually just put sesame seed, but nigella seed works nicely too, as does finely minced onion or garlic. Imagine it’s a giant bagel, just add whatever you would like on a bagel.
Rub flour into your baking peel to create a rough surface. Now you need to be fast so the dough does not stick to the peel. Put your dough onto the baking peel. Then quickly slide the dough onto the baking stone in an oven preheated to 400F. You just put the tip of the peel on the far end of the stone and wiggle it back and forth until your dough slides off – that’s why it’s crucial to flour the peel first, otherwise the dough might stick. If your dough ends up sticking to the peel and won’t come off, it’s no big deal, just take the dough with your hands and put it onto the stone (be careful not to burn yourself).
Bake this for about 15 minutes until the bread has a nice golden brown crust. Enjoy!
This is one of my favorite soups and it’s very easy to make. Mastava is a thick, hearty soup of rice, meat, potatoes, and other vegetables, served with a dollop of sour cream. Like many Central Asian soups, it is first “fried”, then water is added to make it into a soup.
Don’t worry about the exact proportions of the ingredients, just make sure you don’t put in so many things that it doesn’t fit in your pot! You can add in whatever other vegetables you have on hand. It’s a good dish to make a big batch of on weekends if you are too busy to cook during the week, or happen to have a lot of vegetables on hand. It stores well and tastes even better the next day.
I made this Uzbek-style nan bread to eat with the soup. The recipe is very similar to the Uyghur nan bread I posted earlier, although there are some slight differences. The Uzbek nan is generally softer and thicker. I’ll do another post on it soon.
This recipe is from Восточный Пир by Hakim Ganiev.
Ingredients
Meat (beef or lamb) diced into cubes
Onion, diced
Garlic, diced
Carrots, diced into cubes
Potatoes, diced into cubes
Bell peppers, diced into cubes
Tomatoes, diced into cubes
Rice (only a handful, soaked in warm water for 20 minutes) – you can just use regular rice for this as it will get soggy in the soup
Tomato paste
Salt
Cumin
Black pepper
Sour cream (garnish), or smetana if you have it
Cilantro (garnish)
Directions
1. Sautee the onions in oil, on high heat, until they are slightly translucent and golden. Add the meat and garlic and sautee.
2. When the meat is browned, add in the carrots and bell peppers. Cook this for a few minutes on medium heat.
3. Add in a few big spoonfuls of tomato paste and mix well. Add the tomatoes. Mix everything well and cook for a bit.
4. Add the potatoes, salt, and spices (ground cumin, black pepper). Cook for a few minutes.
5. Pour in cold water until you have as much soup as you want. It will be a fairly thick soup in the end.
6. Turn the heat to high until the water has just started to boil. Then turn to minimum heat and let it simmer for 15 minutes.
7. Add in the rice and let it simmer for another 10-15 minutes until the rice is soft.
8. Salt to taste. The soup is done! Serve with a spoonful of sour cream and chopped cilantro.
Taking a break from the meat-heavy dishes on this blog, here is a Georgian vegetable stew that’s very simple to make. I cooked it the other day together with some cheese bread, and didn’t even notice I was eating a vegetarian meal!
This recipe is from Практическая энциклопедия грузинской кухни (A practical encyclopedia of Georgian cuisine) by Elena Kiladze.
Ingredients
Eggplant (1 large)
Potato (2 medium)
Tomatoes (3 medium)
Onion (1 medium)
Cilantro
Basil
Parsley (optional)
Dill (optional)
Garlic
Salt
Red pepper powder
Black pepper
1. Cut the eggplant and potatoes into half circles, the onions into half rings, and the tomatoes into quarters. Finely mince the garlic and greens.
2. Fry the onions over medium heat until they are golden brown, then add the potatoes and fry these for another 2-3 minutes.
3. Add the eggplants and tomatoes, cook for 5 minutes, stirring from time to time.
4. Pour in 1/3 cup of water, turn down the heat to minimum, then cover the pot and cook for 15 minutes, stirring occasionally, until the potatoes and eggplants are soft.
5. Add the garlic, greens, salt, pepper, and mix well. Turn off the heat and let sit covered for some time. Enjoy!
I’ve returned from a 2-week trip to Central Asia! I spent a week in Uzbekistan and a week in Kyrgyzstan, eating some of the foods I write about on this blog. Prior to this trip, it had been 8 years since I was last in Central Asia (in Xinjiang) so it was good to eat some old favorites and try some new foods.
Plov
Uzbekistan is the motherland of plov and it did not disappoint in this regard! I ate plov in every city I visited – Khiva, Samarkand, Bukhara. Each region has its own plov variety, which I found really interesting as there is basically only one variant of plov(or “polo”) in Xinjiang. The Uzbek plov was generally oilier than mine, and their rice grain is different. I had been using basmati, but in Uzbekistan they use a thicker, rounder grain of rice, almost like risotto or Japanese sushi rice. Here’s my plov recipe.
Plov in Bukhara.
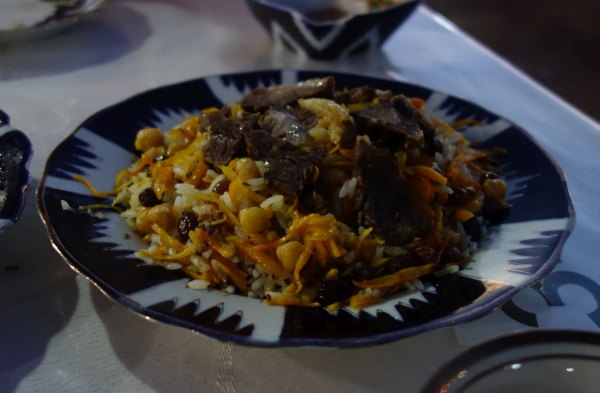
Plov in Samarkand. Note the chickpeas and how all the elements (rice, carrots, meat) are separate.
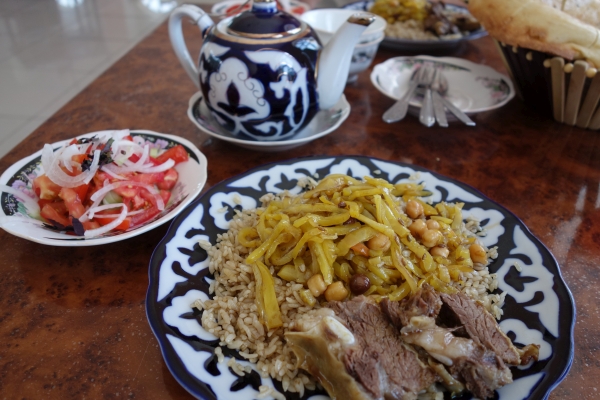
Plov in Khiva. Note how the rice is all white.
Laghman
Finally, to eat laghman made by someone other than myself! While Indian biryani or even Turkish pilaf has some resemblance to plov, there’s basically nothing like laghman to be found in the West. I keep cooking and cooking laghman at home, and after 8 years away from Central Asia, sometimes began to wonder if anyone else on earth eats this dish. Here is my Uyghur lagman recipe.
Uyghur-style laghman at Chinar restaurant in Bukhara
Kovurma laghman at Besh Chinor restaurant in Samarkand
The traditional Uzbek lagman is more like a noodle soup with all sorts of vegetables and potatoes in it. It’s often flavored with dill. However, they do have other varieties of lagman like “kovurma lagman”, which resembles the Uyghur version (noodles with a sauce on top), and many restaurants sell Uyghur-style laghman as well. I personally much prefer my laghman with a sauce topping rather than in a soup.
Guiru laghman at an Uyghur restaurant in Osh.
Guiru laghman in Bishkek.
I was pleasantly surprised by the food in Kyrgyzstan, at least in the cities. While the traditional Kyrgyz food might not be that exciting, due to their location in between Uzbekistan and China they have some great restaurants serving Uzbek, Uyghur, and Dungan cuisine. The laghman was great, and actually surprisingly similar to the one I cook at home. Of course, since my own recipe comes from an Uyghur chef from Bishkek, perhaps it’s not so surprising.
Manti
A staple of our travels! This is one dish I rarely make at home because it’s just so time consuming; plus it’s easy to just buy frozen dumplings from the Chinese grocery even if they aren’t the same thing. But Central Asian manti are really quite special, especially with some yogurt sauce. Chuchvara soup is even more time consuming; I admit I’ve only done it myself once because it takes so long to fold all those tiny dumplings. Here is my manti recipe.
Meat
In Kyrgyzstan I ate a dish called “kuurdak” which is very similar to “kazan kebab”(I haven’t posted the recipe yet). Basically roasted meat with potatoes. It’s rather oily, but very tasty.
Kuurdak at an Uyghur restaurant in Osh.
I also ate plenty of shashlik/kebabs in Uzbekistan. Here’s a meal from a rest stop in the middle of the Kyzyl Kum desert on the road from Khiva to Bukhara. For being in the middle of a desert, they had surprisingly good food.
Shashlik lunch at a rest stop in the Kyzyl Kum desert
Shashlik at Besh Chinor restaurant in Samarkand
On the left, “hasip”, a type of Uzbek sausage; on the right, “naryn”, cold noodles with horse meat. At “Miliy taomlar”(National foods) in Tashkent.
Bread
In Uzbekistan they generally make a big, puffy, round sort of bread as opposed to the flat disc-shaped bread you see in Xinjiang. I bought myself some Uzbek bread stamps in Samarkand – a cooking tool almost impossible to find in the West, though you can order one at quite some cost from China – details in my nan bread recipe. I found them in the Siyob bazaar in Samarkand, sold for 10,000 som each (around $2.50 USD). Not really a common tourist souvenir so may be hard to find outside of a bazaar, although I remember seeing them being sold in Khiva as well.
Beautiful bread bought from Samarkand’s Siyob bazaar.
In Kyrgyzstan, they served a type of bread called “boor sok.” It’s little pockets of frybread, not unlike sopapillas. Very tasty. I’ll have to try making them at home.
Cold dishes/appetizers
At every meal, some type of salad was served, usually with the bread. Typically a simple salad from tomatoes, cucumbers, and onions, and a pinch of salt, but sometimes flavored with some fresh herbs too. You can see the little salad in most of the pictures above.
Ashlyanfu at Arzu restaurant in Bishkek
I also got to try “Ashlyanfu”, which comes from Dungans (Chinese Central Asians). It’s a cold noodle soup with wheat noodles and mung bean jelly noodles. Sounds strange, but very good. I’ve yet to try making this one at home, maybe because it seems rather labor intensive (making the jelly noodles). In mainland China, they eat something similar called “liang pi”; I eat it sometimes at the Chinese places near my home.
Tea
Naturally, green tea was served at every meal. Unlike in Xinjiang where people “wash” the tea bowls with some hot tea and then throw it out, in Uzbekistan they pour some tea into a bowl and then pour it back into the pot, sometimes multiple times. I picked up my own Uzbek teapot and tea bowls. They were selling all sorts of fancy elaborate porcelain in the tourist shops, but I really just wanted the same exact blue and white teapot that appears in almost every restaurant in Uzbekistan (it makes an appearance in a few of the pictures above). Luckily I found them in Siyob bazaar in Samarkand for cheap – a teapot and four bowls was around 25,000 som or $6 USD.
Hope you enjoyed the photos – I’ll try to get back to posting recipes soon.
Da pan ji (大盘鸡 “big plate chicken”) is one of the few foods that is equally popular among Chinese and Uyghurs. It originates from Xinjiang, but is claimed by neither group: Uyghurs regard it as a Chinese dish, and Chinese regard it as a Xinjiang specialty. Regardless of who originally came up with it, it’s become quite popular in the rest of China and can even be found in Chinese restaurants abroad.
Dapanji served in an Urumqi restaurant.
Just like the name, it’s a big plate of chicken stewed in a rich, spicy sauce with potatoes, green bell peppers, and chilies. The star anise makes it amazingly fragrant when complete. There are plenty of variations in the sauce and how it is served: some places serve it with noodles, other with bread, others just by itself. I personally love eating it with Uyghur nan bread to soak up the sauce.
Dapanji served in a Kashgar restaurant.Nan bread is great with dapanji, recipe here.
Ingredients:
Chicken (1-1.5lb, I use dark meat that won’t get tough during the cooking)
Potatoes (3-4 medium sized ones)
Green bell peppers (1-2)
Onions
Chinese fermented black bean sauce (豆瓣酱 doubanjiang)
Chili garlic sauce
Tomato paste
Soy sauce
Dried chilies
Star anise (八角 bajiao, 5-6 pieces)
Sichuanese peppers (optional, a small handful)
Can of beer or Shaoxing cooking wine (optional)
Sugar
Directions:
Prep: Chop the potatoes into medium pieces – not too big or they won’t cook through, not too small or they’ll get overcooked and make the sauce starchy. Chop the chicken into small to medium-sized pieces. Chop the green bell peppers into medium-sized square pieces.
1. Heat the wok on high heat and add oil. When the oil has heated, add a small amount of sugar (1-2 teaspoons) and mix well.
2. When the sugar has melted into the oil, put in the chicken and stir fry this until it is browned. The melted sugar will give the chicken a nice golden color.
3. Put in the onions and cook these until soft and light brown.
4. Add the black bean sauce, chili garlic sauce, and tomato paste. Add a good dollop of each – maybe 2-3 tablespoons worth. Mix everything well.
5. Salt, and add the dried chilies and Sichuanese peppers, mixing everything well. Add in the potatoes.
6. Add soy sauce, add the beer or wine (if you are using it), and add enough water so the broth almost covers everything.
7. Put in the star anise. Once the water boils, turn the heat down to medium. Mix everything well, cover the wok, and let this cook for at least 25 minutes.
8. Taste the sauce and reduce if too watery. The sauce should be spicy, aromatic, and savory. Finally, add the bell peppers and let them cook briefly. Dapanji is one of those dishes that tastes better the next day after it has been sitting in the fridge; the flavors thicken and become more complex with time. Ideally, let it simmer over minimum heat for a while before serving. Serve in a big serving plate; you can put noodles or bread on the bottom to soak up the sauce, or serve them separately. Enjoy!


