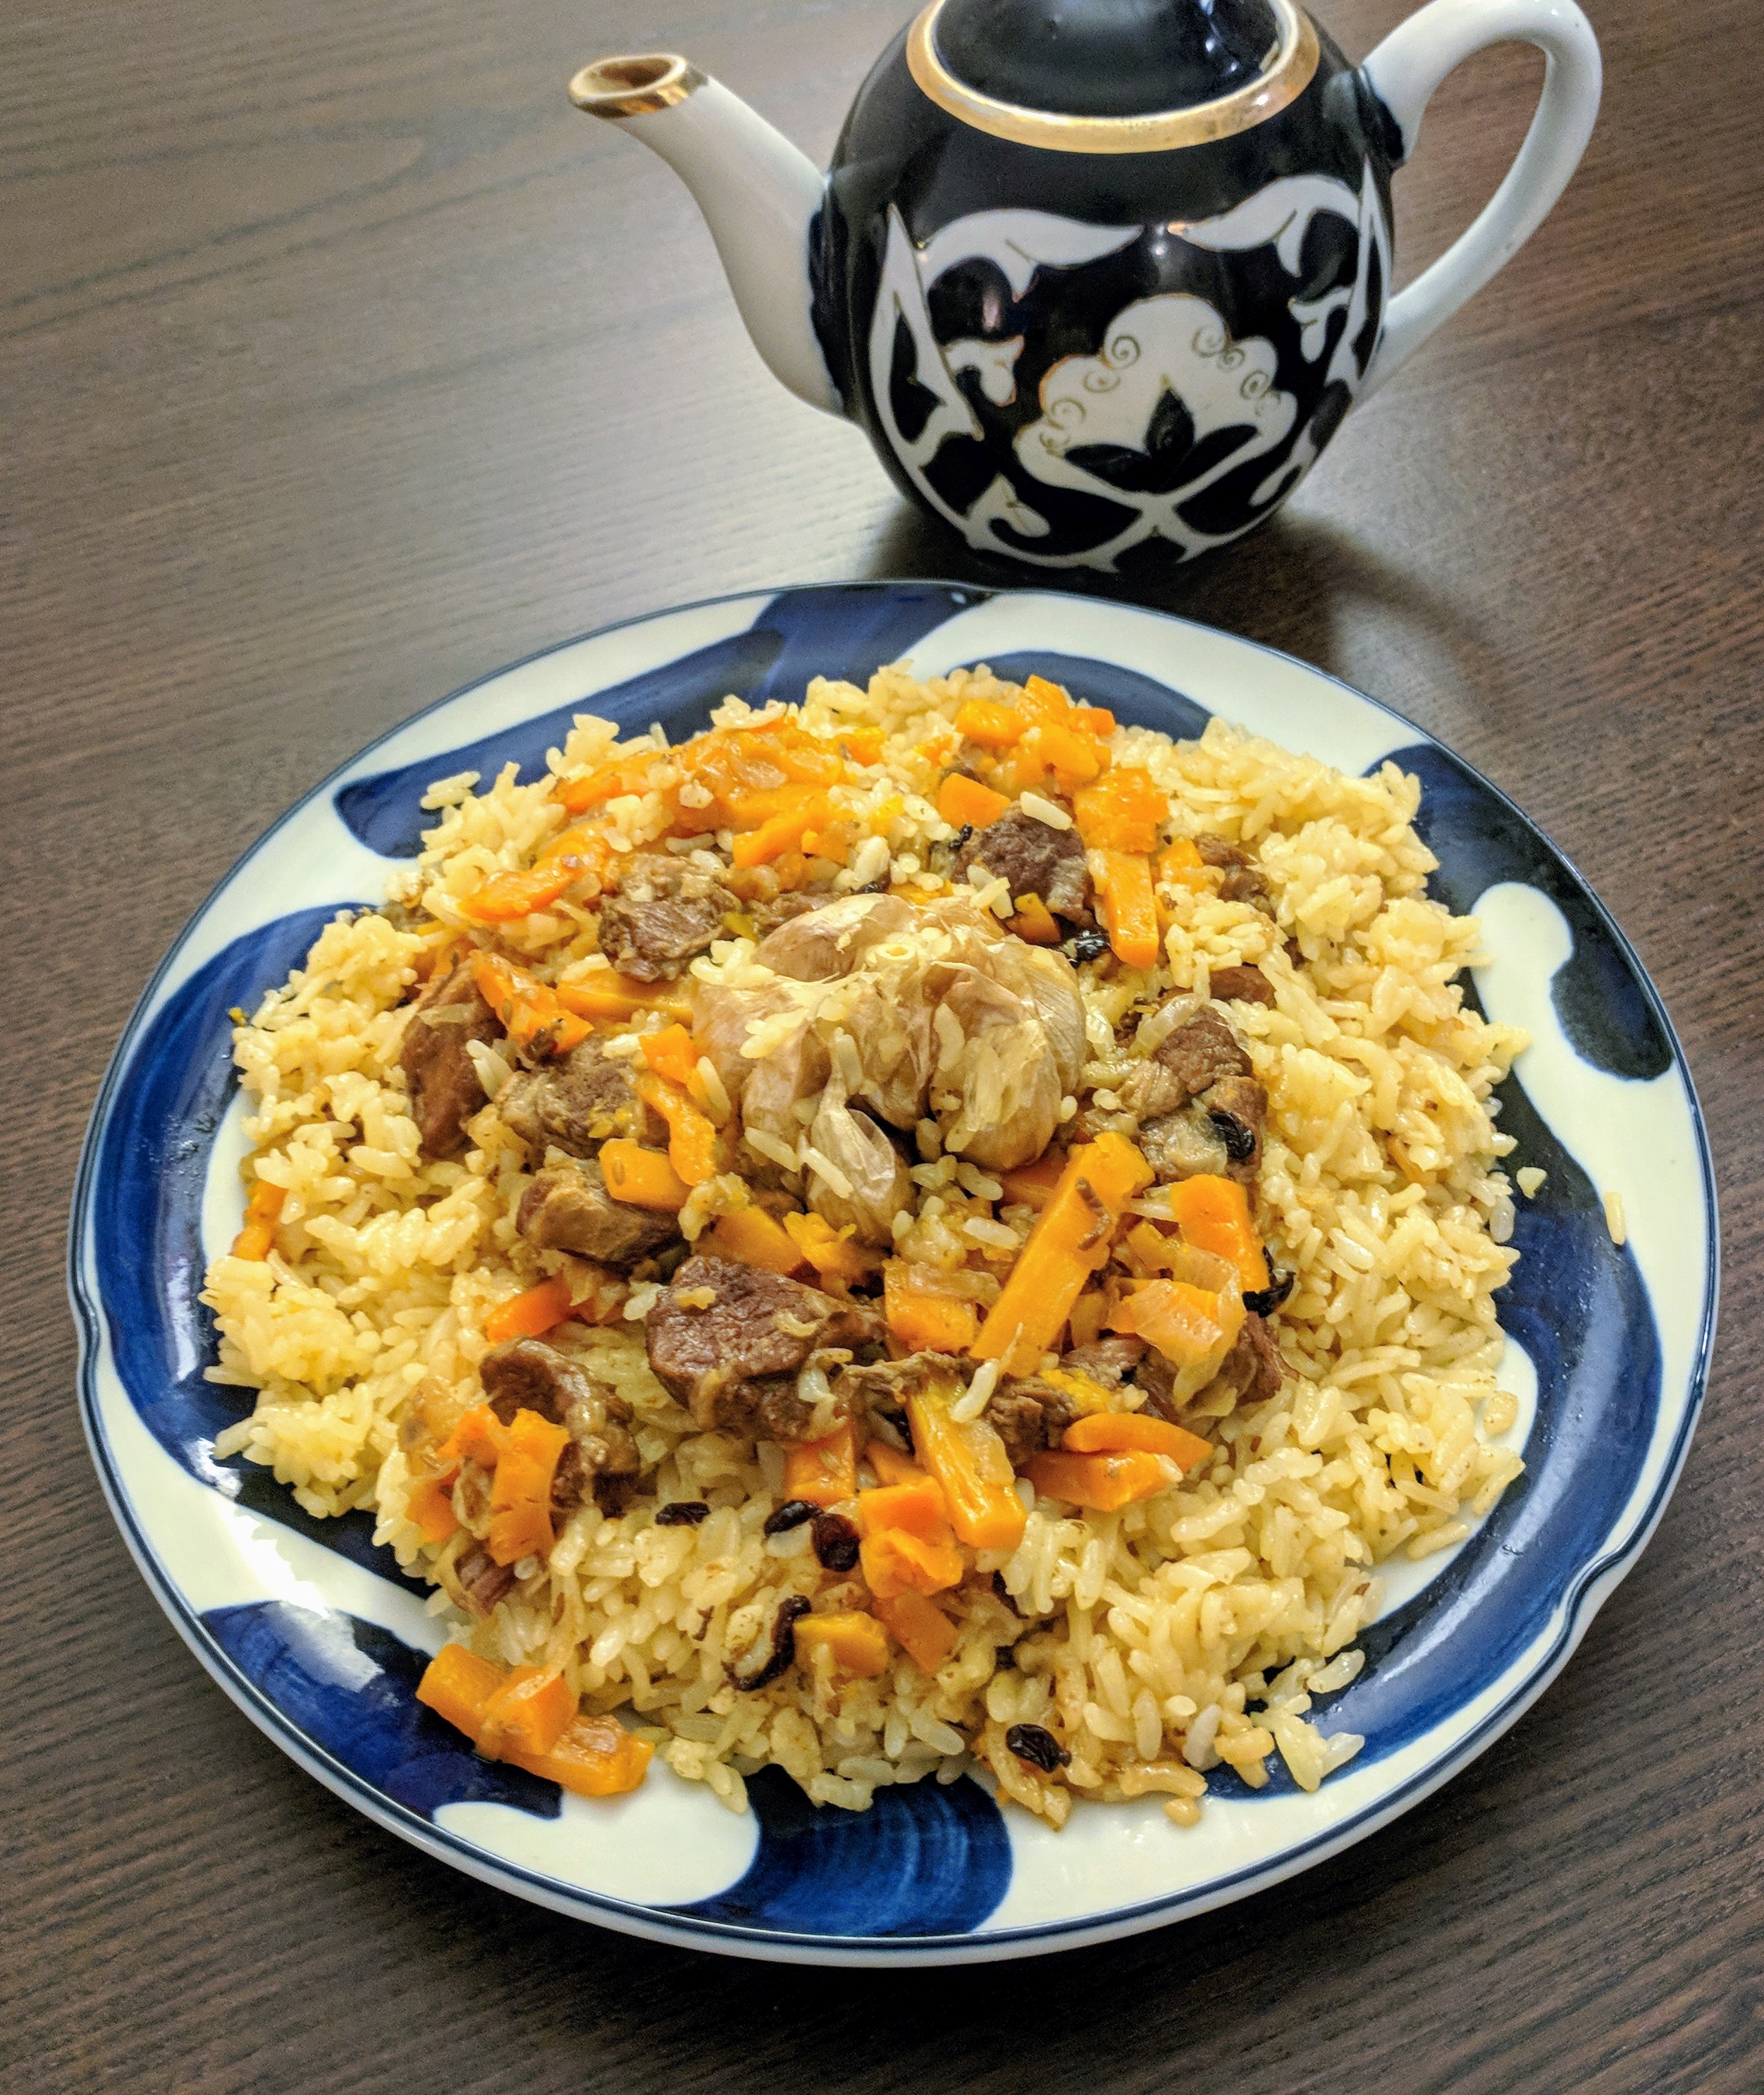
My version of Uzbek plov, cooked in an Instant Pot.
Plov in an Instant Pot instead of a kazan? Isn’t that sacrilege? Possibly. But I’ve discovered that cooking plov in an Instant Pot or electronic pressure cooker is faster, easier, tastes just as good as cooking in a kazan (dare I say it, maybe even better), and most importantly – the results are consistently repeatable!
Ingredients (4 portions) 600 mL of rice (about 500 grams) – long discussion of rice type in the original plov post, but long story short – don’t use East Asian varieties of rice, use a round, medium or long grain rice – e.g. risotto rice, paella rice, Turkish baldo rice, and in a pinch you could use basmati. I use Turkish baldo rice, (Amazon link). They also sell it at Kalustyan’s in NYC. Water – see below for amount
0.5 lb lamb meat
Small piece of lamb fat, chopped into small pieces (optional) Vegetable oil – canola or peanut (I prefer peanut, it tastes better)
3 medium-sized carrots, sliced into sticks 5-6cm long and 0.5×0.5cm thick
1 medium to large onion, sliced into half-moons
1 small onion, halved (optional) Cumin seed, roughly ground in mortar and pestle Salt Garlic head
A few dried or fresh chili peppers Barberries (optional) – they add a nice sour flavor. You can find these at Kalustyan’s.
How much water to use and how to rinse the rice The right water to rice ratio is 1:1 by volume, or 1.2:1 by weight. Make sure to account for water sticking to your rice after you rinse it. Example process:
1. Weigh the dry rice, find it is 500g
2. Rinse the rice
3. Weigh the rinsed rice, find it now weighs 700g
4. Calculate needed water = 1.2 * 500 = 600g
5. But there is 200g of water stuck on the rice, so we only need extra 400g of water. Measure this out and set aside.
Instructions
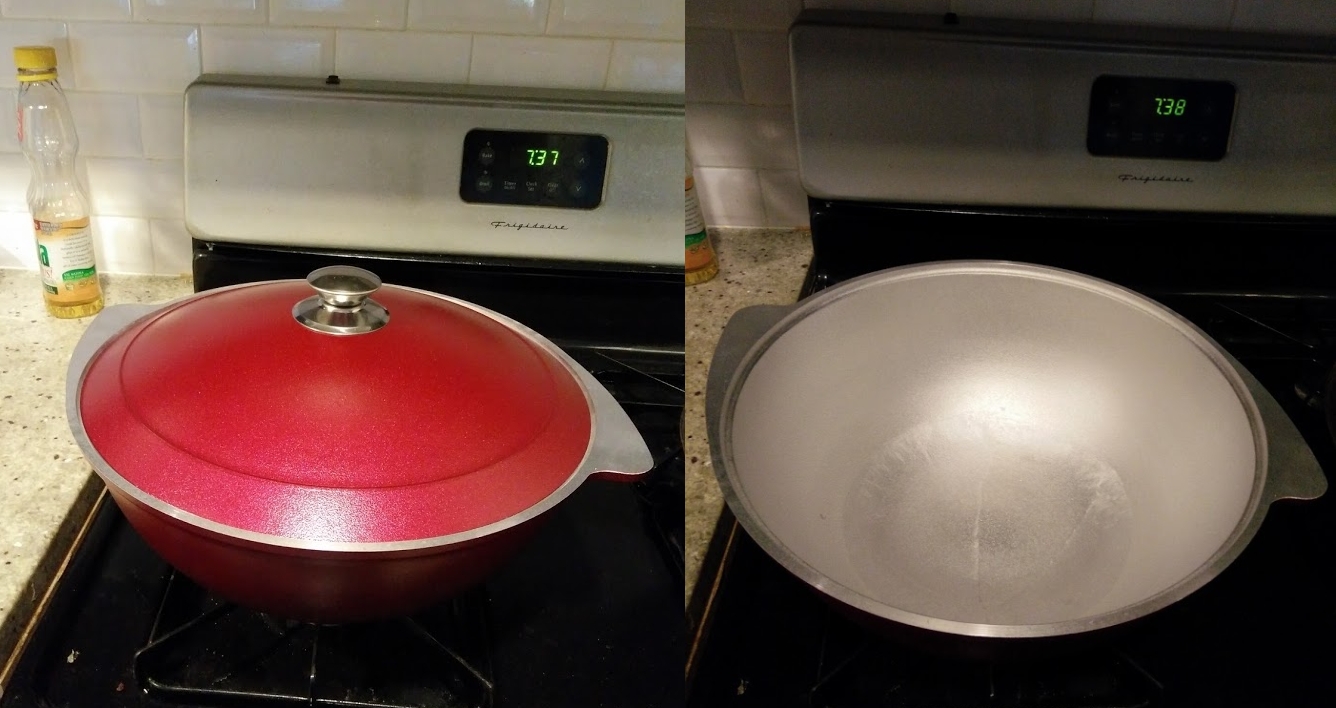
1. Put the instant pot on ‘saute’ mode and put in the lamb fat pieces. Let them fry until they have released most of their fat and only the cracklings are left. Remove the cracklings (they make a nice snack). Skip this step if you don’t have any lamb fat.
2. Pour some vegetable oil in, enough to coat the bottom of the pot (if you put enough fat in from step 1, you might not need any). Then put your small onion in, and roll it around in the oil, letting it fry until slightly brown on the outside, then remove the onion and discard it. People do this because they claim that the onion ‘absorbs’ the bad taste of the vegetable oil. I just do it for the sake of tradition, but you can probably skip it if you want.
3. Put in the onion slices and let these fry 5-10 min until they are a nice brownish color – they don’t need to be caramelized.
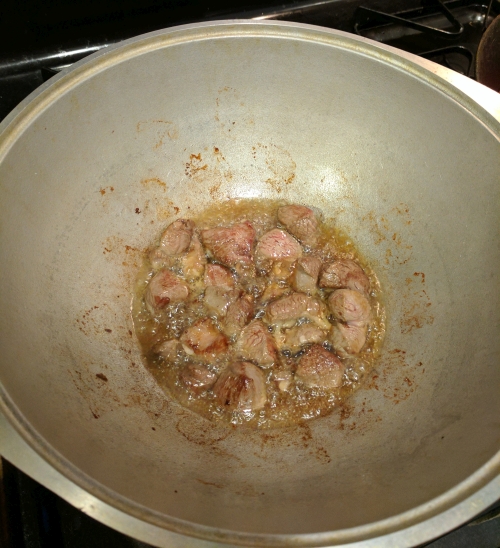
4. Put the meat in and fry it for a minute until it’s lightly browned on the outside – do not go overboard in cooking it since we are going to pressure cook it. It should still be raw and soft at this stage.
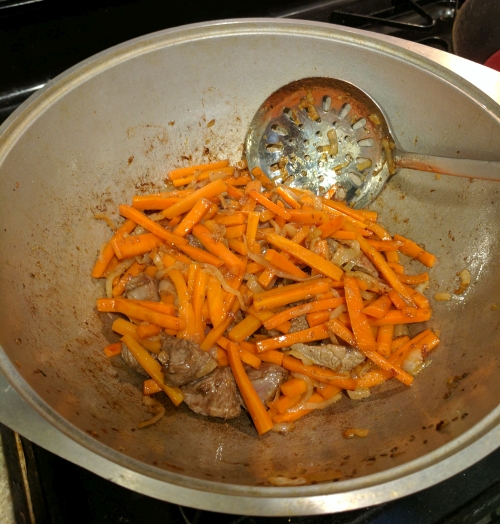
5. Put the carrots in along with a pinch or two of cumin seed and mix everything up. Cook the carrots for a while until they start to brown.
6. Pour in the water you set aside (explained above). Put a pinch or two of salt in, the chili peppers, and stir everything. Before you put the lid on, make sure nothing is sticking to the bottom of the pot. Close the instant pot lid, set the vent to ‘Seal’, and set the Meat/Stew setting for 15 minutes. You will notice a garlic in the photo, but actually it is better to put it in later (it will disintegrate if you put it in now).
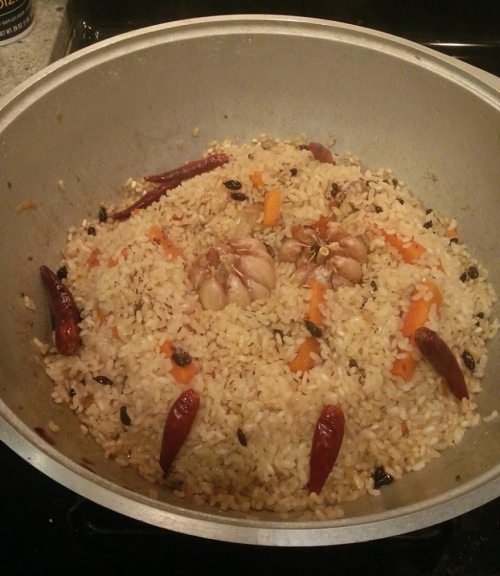
7. After the 15 minutes are up, let it sit for 10 minutes. Open the lid and put the barberries in. Then quick release the pressure and place the rinsed rice in an even layer ON TOP of the other ingredients – DO NOT MIX. You want the rice layer to be as flat and even as possible. You can put in the garlic head if you didn’t in step 7 (bury it in the middle of the rice). Then again close the lid, set the vent to ‘Seal’, and set the ‘Pressure Cook’ setting for 5 minutes.
8. After the 5 minutes are up, let it sit for 10 minutes, then quick release the pressure. Fluff up the rice a bit with a fork to help the grains separate, and let the rice cool down and firm up for a bit before you plate it.
10. The plov is ready! Plate it with the rice on bottom, meat/carrots on top, and garlic in the middle. The rice grains should be individual and slightly chewy, though cooked through – ‘al dente’.
Summary: Measure out the rice by weight, and target 1.2x that much in water. Rinse the rice, weigh it, and determine the remaining amount of water needed. Keep the water aside.
1. Prepare the oil/fat
2. Saute the onions until brownish
3. Brown the meat
4. Put in the carrots and cumin
5. Put in the water, put in salt, chilis
6. Meat/stew setting for 15 minutes, release pressure after 10 minutes
7. Put rice in an even, flat layer on top, put barberries, put garlic
8. Pressure cook on high for 5 minutes, release pressure after 10 minutes
I first ate plov (плов) in a small canteen in Turpan, an oasis city in the deserts northeast of the Tarim Basin. Uyghurs call it “polo”, and restaurants in Xinjiang make it in gigantic kazans outside, dishing it out as ordered and topping it with a hunk of fatty lamb meat. It was one of my first tastes of Central Asian cuisine, and incidentally the first dish I started cooking with. I’ve learned a lot about making plov since my first post on it over a year ago; this is a complete re-do of the old recipe with new photos.
Cooking plov in Turpan, XinjiangPlov preparation step by step.
Plov could be considered a pan-Asian dish; whether Uzbek plov, Uyghur polo, Indian pulao, Afghan palaw, Iranian polow, or Turkish pilaf, the basic idea is the same: rice and oil. The recipe I present here is for Uzbek plov (specifically, Fergana style), which tastes very similar to Uyghur polo, and is the most common type of plov in restaurants outside of Central Asia. Uzbekistan is the spiritual “homeland” of plov with many different regional varieties.
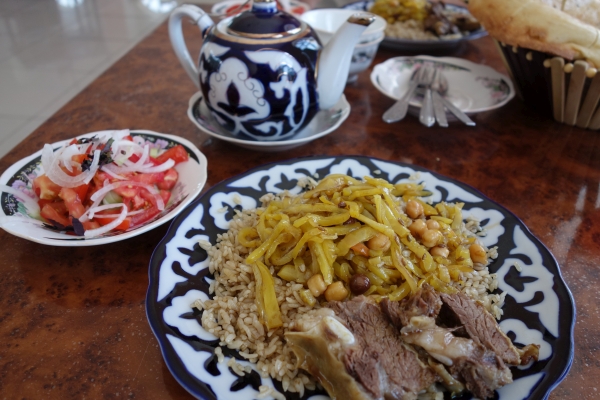
Plov in Bukhara
How should plov taste? In the ideal Uzbek plov, the rice grains should be separate, maintain their form, and not stick together. The rice should be tender, yet firm: a good plov is not mushy and sticky like porridge, nor is it creamy like a risotto. The closest equivalent in European cuisine is probably paella.
Plov should be rather oily, and after eating there should be a layer of oil left on the plate. The meat for plov should be tender lamb meat. The carrots should be in big chunks, soft and sweet, having been caramelized during the cooking. Overall, the plov should have a nice balance of tastes between savory/lamb meat, salty, oily, cumin, and sweet (onion & carrot).
Plov served in a chaikhana in Bukhara.
Cooking utensils It is best to make plov in a kazan. In the past, I made plov in a cast iron wok (and you can see this in many of the photos), but your plov will turn out much better in a kazan. It’s very easy to mess up plov, especially if you use the wrong cooking vessel. Read this post to learn what kazans are and where you can buy one.
My kazan
Making plov is a journey that will probably require many, many tries and many soggy, mushy, burnt, or not-cooked-enough plovs. I have been making it for over two years and every time I make it, I still find some way to hone my technique.
There are many plov video recipes on the net, but the most simple, straightforward one I have found is this one (in Russian).
Ingredients:
IMPORTANT! Unlike most of my other recipes, the proportions (critically, that of water to rice) are extremely important in plov. Incorrect proportions can ruin the dish. This recipe serves 4-5 people.
0.5 kg rice: The choice of rice has a huge effect on the finished product, as much so as your cooking. I recommend Turkish baldo rice paella riceas it is the most similar in size, shape, and texture to the rice used in Uzbekistan. Spanish calasparra rice (used in paella)is another good choice. Risotto rice can also work, but can be on the sticky/creamy side. Basmati will work, but only the parboiled kind (“sela” rice), and it isn’t at all like Uzbek rice. East Asian rice will not work because it is too sticky.
In plov, it’s very important that the cooked rice grains stay separate and not a sticky mush. The Russian term for this desired consistency is “рассыпчатый.”For this reason, it’s basically impossible to obtain a good result with East Asian rice, which by design is supposed to stick together.
Basmati is often used to make plov outside Central Asia, but in texture and shape it is really quite different from the rice in Uzbek plov. On the plus side, it tends not to stick together, making it a good choice for a beginning cook. Look at the difference in these two pictures below. On the other hand, in northern Afghanistan they have their own “Uzbeki pulao” which seems to be made using basmati rice. They use a special, parboiled type of basmati rice called sela rice which holds its shape and tends not to stick together or get mushy, unless you really drown it in water.
On the left: Uzbek plov using calasparra rice. On the right: Persian style palaw using basmati rice. The rice texture is totally different.Plov in Samarkand. Notice the rice is medium grain and plump, not at all like basmati.
So to summarize, here are my criteria for correctly cooked plov rice:
1) Uses medium grain rice, not basmati, not parboiled
2) Rice grains “al dente”, a bit of chew
3) Rice grains not mushy/sticky/creamy; grains should be individually defined and separate easily when you fluff or toss the rice.
Close up of the kazan with a properly cooked plov. The grains are individual, cooked through to “al dente”, and not sticking together. The rice is not basmati and it is not parboiled.
Rice to water proportions: This is really important in making plov with the correct texture, and for whatever reason seems to be completely overlooked in almost all recipes. I am all for eyeballing things but this is the one time you need to be crazy precise in measuring, unless you want a pot full of soggy mush. Essentially, you need 1:1 in volume of water to rice (or 1.2:1 in weight of water to rice), minus the amount that sticks to the rice after you rinse it plus the amount of water lost to evaporation (which is usually about 1/2 cup, and does not scale). This will vary depending on your cooking setup and the type of rice you use (since different rice varieties can take longer to cook).
Rinsing the rice and measuring the water: First, measure the dry rice (say we use 500 grams). Rinse the rice in a pot, pouring out the cloudy water until it becomes clear. Now measure the weight of the rinsed rice. It might go up to 700 grams (meaning there is 200 grams of water stuck to the rice). But we only need 500 * 1.2 = 600 grams of water, so we only need an extra (600 – 200) = 400 grams of water. Measure out the 400 grams of water. Then, add in the water needed for evaporation – 125mL. Keep the rinsed rice and the pre-measured water aside.
0.5kg lamb meat – I have used lamb shoulder chops and lamb leg, all work fine for plov. Pre-measured water – see above 2 medium onions 3 large carrots Cumin seed – You need the whole seeds – cumin powder is a poor substitute. Grind a few good spoonfuls of cumin seed with a mortar and pestle – it doesn’t need to be a powder, just lightly ground is fine. 2 garlic heads
Dried chilies or fresh chili peppers – not that many, maybe 5-6 small ones or 1-3 big ones. Can be omitted. Salt Vegetable oil and/or lamb tail fat
Barberries or raisins (optional) – barberries can add some nice acidity to the dish. I typically don’t like raisins in plov (too sweet), but some do.
Directions (takes about 3 hours start to finish)
1. Cut the onions into slices (half moons).
2. Cut the carrots into big sticks. You want fairly big pieces, maybe ~2 inches long and 1/4 inch thick. While it may seem like a lot of carrots, keep in mind they will shrink dramatically during cooking. Generally err on the side of too much carrot. I don’t think I’ve ever had a plov with too much carrot, but I’ve certainly noticed when there is too little.
3. Debone and cut up the lamb meat. Cut out the fat and bones, and keep aside. Chop the lamb meat into medium sized pieces.
4. Heat up the kazan and heat the oil. Put the kazan on high heat. Once the kazan is hot, add vegetable oil to cover the bottom in a fairly deep layer, and wait a bit until the oil heats up.
You should have at least this much oil in your kazan, maybe even more!
If you are lucky enough to have lamb tail fat (курдючный жир, kurdyuchniy zhir) then instead of oil, you can cut the fat into slices and melt them into oil. The resulting fat crisps make a tasty snack. Remove the crisps. Lamb tail fat is a luxurious rarity for me here in NYC, so I usually melt the fat pieces into oil, then add vegetable oil. I buy it at the Fortuna grocery in Brooklyn.
Lamb tail fat starting to cook.
5. Prepare the oil. If you are using vegetable oil, take a small onion, remove the skin, and fry it in the oil, letting it cook on all sides until the whole thing is brown, then remove the onion and discard it. While vegetable oil in small amounts lacks any discernible taste, the amount we are using means you are going to notice its flavor. Vegetable oil has a weird taste to it, and putting the onion in helps absorb the weird flavors and replace them with onion-y flavors. If you really can’t bear to use up the extra onion, you can skip this step, but your plov might taste off.
6. Fry the fat and bones and meaty bone pieces. Fry these pieces until they get to a nice golden-brown and you smell the aroma of lamb fat. Then remove them and keep the meat and bones aside (you can discard the fat pieces). This will help to further flavor our oil.
7. Fry the meat. Fry until it develops a nice golden brown around the edges, then remove it and set aside so it doesn’t overcook during the next steps.
8. Fry the onions until they are a light brown color. They don’t need to be fully caramelized, just a little brown around the edges is fine.
9. Put in the carrots and add about 3/4 of the prepared cumin seed. Fry for 15 minutes until the carrots are soft. Cook them as long as you need to until you can easily pierce them with a fork. Then add the meat back in and fry everything together for a minute or so.
10. Make the broth. Take the measured water and pour it over everything. Put the bones back in. Put in the garlic heads and the chilies. Add raisins and/or barberries if you are using them. When the water boils, turn it to low heat, and let it simmer for at least 40 minutes to 1 hour, uncovered. This broth is called “zirvak.”
11. Remove the bones, garlic, and chilies, and salt the broth. If any of your bone pieces have a good amount of meat on them, save them for later. Keep the garlic and chilies aside. Salt the broth and taste – it should be very salty. Remember, you are going to add rice in, which will absorb the broth.
12. Add the rinsed rice in. Then carefully add the rice in a layer on top of the other ingredients (do not mix it). Carefully smooth out the rice into an even layer.
All of the water we see in the pot needs to be absorbed by the rice (some will evaporate, but the majority will go into the rice). This is why the measurement in the last stage is so critical. If we added too much water, the rice will be forced to absorb too much, and become soggy and mushy.
This is what it looks like after I put in the rice. I don’t add any additional water.
13. Cook the rice. Turn the heat as high as possible. There should be big bubbles bursting all over the top of the rice. Rake the rice back and forth, slowly flipping the top layer to the bottom so that all the rice can get cooked evenly.
14. Let the water boil off. As the water boils, it should drop below the top of the rice. We want the water to be completely gone.
At this point, the rice should have absorbed the water, but not be “done.” In other words, the rice should have grown to its full size and “look” done, but it should still be crunchy and undercooked when you bite into it. If you can chew through the rice, do NOT add more water! I have ruined many perfectly good pots of plov thinking that the rice needed more water. It does not. Steaming will take care of it.
However, it should not be so hard that you cannot chew through it. If the rice is too hard to chew through, add a tiny bit more water as necessary and cook until you can chew through it. Otherwise, turn the heat down to medium and let the rest of the water boil off.
As the water drops, make holes in the rice to help the water escape more quickly. Check the holes and the sides of the kazan for any water remaining – keep in mind oil will always be at the bottom, don’t burn the stuff at the bottom thinking the oil is water and trying to boil it off. When the water is gone, turn the heat back down to minimum.
15. Steam the rice. Make a small “hill” of rice, and top with the rest of the cumin. Push the garlics and chilies and any hunks of meat on the bone into the top of the rice layer. Make some holes in the mountain to help the steam circulate. Cover the kazan. Make sure that the cover is tight and no steam at all escapes – wrap the lid with towels for a tighter seal and weigh it down with something (I use a bowl). After a minute or so, the cover should be hot to the touch. This final steaming stage is going to turn our plov rice from “crunchy” to “done” and give it that wonderful fluffiness that we desire.
After the cover is hot, turn the heat down to low, and let this steam. The exact time is something of an art, and depends on how done the rice was in the previous stage, and the type of rice you use. If the rice tasted very crunchy and un-done, let it steam for longer: 30 minutes. If the rice tasted almost done, then steam it for less: 20 minutes.
16. Finished! Take off the lid, and remove the garlic and chilies and bone pieces. If the rice is still undercooked, then you can steam it for longer (re-cover it, heat up to medium until the pot is hot again, then turn down to low heat again). It might only be the top layer that is undercooked, in which case just mix it well and steam until the rice is done.
Scoop up the rice and gently shake it back into the pot, to help the rice grains separate from each other. Carefully mix the meat and carrots on bottom with the rice, being careful not to mush the rice together. Plate the finished plov and garnish with the garlic and chilies and meaty bone pieces.
Serving: Plov is often served with a salad of sliced tomatoes and onions called “achik chuchuk.” Just mix sliced tomatoes and onions with salt and a dash of pepper. Sliced cucumber and hot pepper is often added as well, and I like putting in a splash of white vinegar. You can add some greens like mint or cilantro or dill if you like. Traditionally, people drink hot green tea with plov (and in general any greasy dish).
Common mistakes:
Rice became a sticky mush / overcooked – This happens if you use too much water and unfortunately by the time you realize it, the rice is pretty much ruined. It’s critical to err on using too little water, and add as needed.
Rice unevenly cooked after steaming / rice on top too hard, rice on bottom too soft
This happens if the cover is not tight (steam escaped), or you are using a wok or regular pot instead of a kazan (because the thin-walled wok is poor at retaining heat and keeping the top warm where the rice is). In this case, you can flip the rice on top onto the bottom, mix everything up, then steam it for a bit longer.
Tasteless/not salty enough – Besides the obvious culprit of not salting the broth enough, this can happen if you don’t brown the onions enough.
Rice burns at bottom – this happens if you aren’t careful about keeping the rice in a layer at the top.
Meat burns at bottom – Usually happens if you cook the rice for too long during the final steps when all the water is gone. It is also very easy for the food on the bottom to burn if you use a wok or a flat-bottomed pan to cook plov instead of a kazan.
Soman is my absolute favorite Uyghur food. I have never been able to find it outside of China, and today I made it for the first time. It’s been nine years since I’ve eaten it!
Soman goes by a few names – sometimes just “soman”, sometimes “din din soman”, in Central Asia “дын-дын цомян”, and in Chinese 丁丁炒面(ding ding chao mian – literally “stir fried noodle cubes”). It’s essentially the same dish as lagman (recipe here), but the noodles are chopped up into little cubes before cooking. You get lots and lots of little noodle pieces that you can pick up and eat with a spoon – the closest analogue in Western cuisine is the German spaetzle. Despite being similar to lagman, it’s really a completely different eating experience!
Soman, as served in a small cafe in Niya/Minfeng on the edge of the Taklamakan desert.
As with lagman, the dish can be served in a stew, or stir fried with the toppings. This recipe is for the stew version, but the stir fried one is simple – just put less water in your sauce, then add the soman noodles after cooking and stir fry everything for a bit.
How to make the soman
The general process I follow is: 1) make the dough and rest it 2) do all the prep for the lagman 3) coil the dough into noodles 4) cook the lagman sauce and let simmer 5) chop up the noodles and cook them 6) serve.
The magic noodle coil…those who don’t coil their noodles, will not make a good lagman.
The first few steps are exactly the same as in the laghman recipe. My only extra tip is to make sure your dough is not too dry, and that you don’t leave it out for too long. Soman is usually a bit thicker than lagman, and if it dries out, it’s possible for the center to not cook through.
1) After coiling the noodles, brush them well with oil and put them in the fridge for a bit. When you are ready to chop the noodles, start uncoiling the dough pieces and stretch each one out into a basic noodle shape. With soman, you don’t have to be as careful about making your noodles uniformly round & thin like lagman. Using a knife, start chopping the dough into little cubes. Pile the cubes up on an oiled plate.
Chopping the noodles can take much longer than it seems. Try not to pile too many noodle cubes onto one plate, and put the plates into the fridge when full. Otherwise, the noodle pieces can end up sticking and melting together if you leave them for too long.
2) Boil a pot of water and pour all your noodle pieces in! You may find that the noodle pieces have ended up sticking together and to the plate in one big mass of dough. Don’t fret – if you oiled them enough in the coiling stage, they should come apart in the boiling water. Use chopsticks to poke around in the noodles and make sure they separate and don’t stick to the bottom.
3) After the water returns to a rolling boil for a few minutes, try the noodles. They should be al dente. Quickly remove all the noodles, place in a sieve, and briefly rinse in cold water and toss.
How to make the stew
The stew is the same as in the lagman recipe, but make sure you chop every ingredient (meat, vegetables) into a cube shape. The whole idea behind this dish is that everything is chopped up so you can eat it with a spoon.
When the stew is done, plate the soman noodles and generously ladle the stew over it, making sure each plate has a good amount of sauce. Mix everything together in the plate a bit. Enjoy!
This recipe is for the Uzbek bread, obi non, or in Russian “lepyoshka“, but you will see various breads that look very similar to this all over Central Asia – round, and pressed down in the middle, almost like a giant bagel or pizza crust. In Central Asia, bread is such a basic staple food that you get it with literally every meal, without asking for it. If you visit someone’s house, they will bring you bread and tea.
Beautiful bread bought at the Siyob bazaar in Samarkand.
This is a versatile bread and tastes great just eaten by itself, fresh out of the oven. It’s also great to eat with soups and stews, or with jam. It’s most similar to a baguette in taste and texture. This bread is pretty similar to the Uyghur version I wrote about earlier. The difference is that it is much thicker and the pressed down part in the middle is smaller. If the Uyghur nan bread is like a big pizza crust without any sauce on it, the Uzbek nan bread is like a giant inflated bagel.
Bread served at a restaurant in Bukhara.
Making bread is truly an art – don’t be surprised if it doesn’t turn out right the first few times you make it. I had to make this bread 20+ times before it turned out the way I like it, and I’m still trying to perfect my technique.
Bread, tea, and salad at a Khiva restaurant.
In Central Asia this bread is made in an oven called “tandyr”(similar concept to a tandoor oven), slapping the dough directly onto the oven walls, as you can see in the video below. I obviously can’t replicate that at home, but I’ve gotten good results with a pizza stone. Failing that, it would probably turn out OK on a baking pan.
I use some bread stamps I bought in Uzbekistan to make the patterns on the bread. They are called “chekich”; you can see the bakers in that video stamping the dough with them in the beginning. You can buy them from this store on Etsy, or if you know someone traveling to Central Asia, ask them to buy a couple for you – they only cost a few dollars and should be sold in almost any bazaar. In New York, you can buy bread stamps at Fortuna grocery in Brooklyn – they sell small wooden ones behind the checkout counter, along with plates and teapots. If you don’t have a chekich, you can just use a fork.
Ingredients
Flour
Dry yeast
Salt
Sugar
Milk and/or lukewarm water. Milk makes the bread softer. Ratio of flour to liquid: by volume, 3:1. By weight: 1.5:1.
Egg (optional) – to glaze the bread
Toppings for the bread – sesame seeds, nigella seeds, finely minced onion, garlic
Directions
Make a pile of flour with an indentation in the middle. Put your milk and warm water in the middle. Put in half a packet of dry yeast, a teaspoon of sugar, a teaspoon of salt, and a pinch of flour. Then stir up the middle and wait for a few minutes until it bubbles up and turns into a foam.
Mix the water into the flour. When it is solid enough to work with your hands, flour a clean surface and start kneading the dough, adding more flour as required if it gets sticky. Knead this for 10 minutes until it no longer sticks to your hands and is relatively firm and pliable.
Put this in a bowl and let it rest for 40 minutes in a warm place, covered with a clean cloth.
After the 40 minutes are up, the dough should have risen. Take out the dough and knead it again for a few minutes, then shape it into a fat disc and let it rest for another 15 minutes, covered.
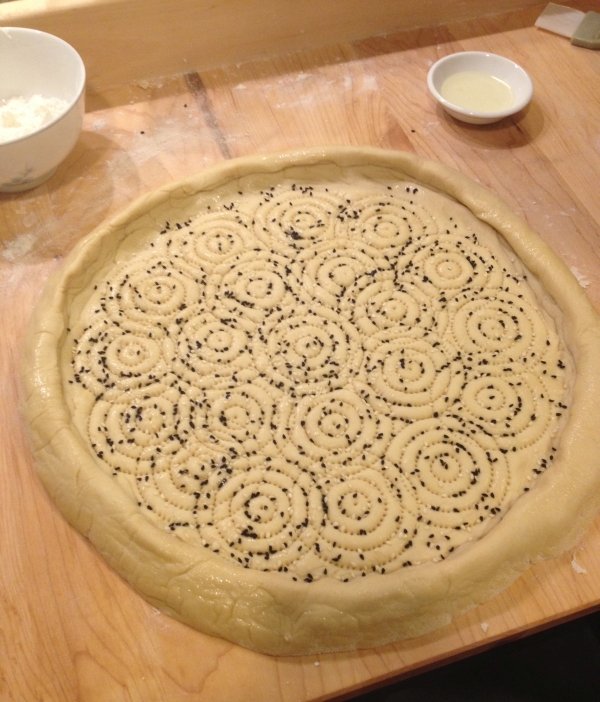
After the 15 minutes are up, take the dough and roll it out into a big circle, not too thin. Then use your fingers to press down the middle of the dough, pushing the air outwards. Don’t make the middle too thin. Use your fingertips to press a circular ring into the middle of the dough. You really want to define a nice circular edge, it’s not so important to press the middle down. Let this rest for another 5 minutes.
Press all the way around your circular indent again. Now use a bread stamp to press down the middle and make nice patterns. The patterns aren’t just to be pretty, the holes help prevent the middle from rising, giving us that nice giant doughnut shape we want. If you don’t have a stamp, you can just use a fork to make holes all around the center. Whether you use a stamp or fork, make sure to press down hard so the holes go all the way through the dough.
Use a brush to cover the bread with a mixture of beaten egg and milk. This will give the bread a nice shiny golden brown crust when it’s done, and also make it sticky so our toppings won’t fall off. If you don’t have egg, you can use just milk to glaze the bread, or failing that, water. The point is to wet the bread – the choice of egg or milk or water just has different effects on the finished appearance. Whatever you do, just glazing the top and sides is fine – don’t glaze the very bottom because it can end up getting stuck to the peel. Then add your toppings – I usually just put sesame seed, but nigella seed works nicely too, as does finely minced onion or garlic. Imagine it’s a giant bagel, just add whatever you would like on a bagel.
Rub flour into your baking peel to create a rough surface. Now you need to be fast so the dough does not stick to the peel. Put your dough onto the baking peel. Then quickly slide the dough onto the baking stone in an oven preheated to 400F. You just put the tip of the peel on the far end of the stone and wiggle it back and forth until your dough slides off – that’s why it’s crucial to flour the peel first, otherwise the dough might stick. If your dough ends up sticking to the peel and won’t come off, it’s no big deal, just take the dough with your hands and put it onto the stone (be careful not to burn yourself).
Bake this for about 15 minutes until the bread has a nice golden brown crust. Enjoy!
My version of Uyghur meat pie or goosh nan. Deep fried version.Steamed version of goosh nan.
Goosh nan (گۆشنان, gösh nan, “meat bread”) is the Uyghur version of a dish that is popular all over Central Asia and the Turkic world. It’s a round, flat pie stuffed with mincemeat, fried, and sometimes additionally steamed. It was one of my favorite dishes in Xinjiang, and makes a great appetizer or light meal, with plenty of hot green tea to wash it down.
Goosh nan in an Urumqi restaurant.
Goosh nan’s closest relative is the Tatar cheburek (or çiğ börek in Turkish), which is a half-moon shaped dough stuffed with meat and deep-fried. The concept of meat wrapped in dough is a key feature of Central Asian cuisine: manti, börek, chuchvara, goosh nan, and cheburek are all variants of the same idea.
Gosh nan in an Uyghur restaurant in Bishkek, Kyrgyzstan.
Goosh nan is a simple dish to prepare: roll out two pieces of dough to paper thin circles, top one with mincemeat, cover it with the other dough, and fry. Sometimes it is also steamed after frying, and sometimes it is more bready and baked, like in the picture below:
Goosh nan in a Kashgar restaurant.
This recipe is from Abdulaziz Salavat (in Russian). Here is an Uyghur video as well. I like the deep fried version the best, but try the steamed version too; it gives it a unique texture and flavor.
Ingredients:
Finely minced beef or lamb. It’s better when you mince the meat by hand, but ground meat will do.
Onion
Salt
Black pepper
Flour
Water
Egg
Directions: For the filling
1. Finely dice the onion and mix it into the ground meat with salt and black pepper. This is the same basic filling as in manti, cheburek and chuchvara.
For the dough
1. Make a fairly firm dough out of flour, water, egg, and salt. Knead for 10 minutes and let it rest for 30min-1hr (it will be easier to roll out if you rest it).
2. Take two pieces of dough about the size of your palm. Roll each of these out to a wide, paper-thin sheet.
3. On one of the dough sheets, put your meat filling in a circle a bit smaller than the pan you will fry it in. Make the filling smooth and even.
4. Cover it with the other dough sheet, pressing down firmly all around the meat so the dough sticks together.
5. Use a knife to cut out a circle, leaving room around the edges.
6. Use your hands to make little folds all around the edges of the dough and press firmly so the dough pieces do not come apart.
7. Deep fry the pie until golden brown. If you want to make the steamed version, you don’t have to deep fry it (steaming will make it un-crispy again anyway) but still fry both sides until golden brown. When it’s done, drain the pie on a thick pile of paper towels and dab oil off the top.
By the way, if you want to make cheburek, just do all the above steps, except make only one dough sheet, put meat on one half side, then fold it over.
8. If you want the steamed version, put the pie in a steamer, cover, and steam for 25 minutes.
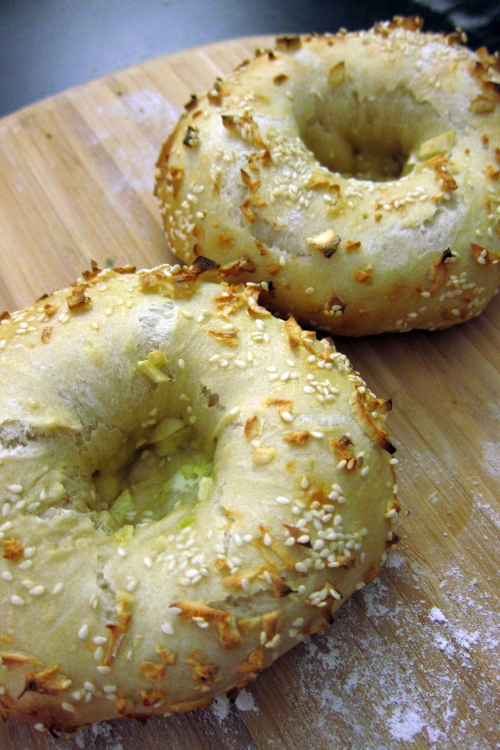
We covered the iconic round Uyghur nan bread in another post. Another one of my favorite Uyghur breads is “girde nan”, which resembles a bagel, or more precisely, a bialy. It’s shaped like a bagel but the hole doesn’t go all the way through. They cook it in tandoor ovens just like nan, slapping it onto the walls and prying it off with tongs when done.
Making these yourself is actually really simple, and way easier than the big disc-shaped bread because you want it to be thick. The instructions are the same as for nan, but shaping them is much easier. You can put your favorite bagel toppings on them too; I like putting garlic even though that isn’t really common in Xinjiang.
Directions
1. In a large bowl, make a mountain of flour with a hole in the middle. Pour warm water into the middle, add 1/3-1/2 packet of dry yeast, salt, and a bit of sugar. Mix well and let stand for a few minutes. When it has gotten frothy, add the egg in. Then mix everything well, adding water as needed.
2. When you have a somewhat firm mixture, flour a surface and knead the dough for 10 minutes.
3. Oil a bowl and put the kneaded dough ball in, cover with a cloth and let rest for 1 hour in a warm place. Preheat the oven to 500 F at this stage.
4. When the dough has finished resting, punch it down and knead it a bit more.
5. Take a piece of dough and roll it into a ball; flatten it a bit with a rolling pin and use your thumbs in the center to make a deep indentation. Use a fork and poke holes all around the edge of this indent and in the center so it doesn’t rise.
6. Coat the outside with egg or oil, and add your favorite toppings: sesame, nigella seeds, poppy, garlic, onion, etc. Bake on a pizza stone for ~10 minutes or until golden brown. Enjoy!
Every restaurant has its own variety of laghman. In Uyghur restaurants, it usually means a dish of noodles topped with lamb and vegetables in a tomato-based sauce. In Uzbek or more Russianized restaurants, it’s often more like a noodle soup. In essence, laghman is just wheat noodles with sauce. Even Italian spaghetti bolognese could be considered a distant European cousin of laghman.
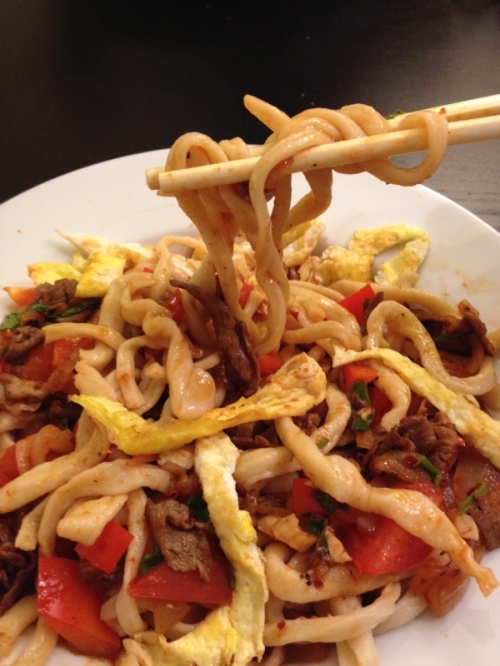
I really like the addition of sliced omelette. The recipe is adopted from Abdulaziz Salavat who calls it “suiru lagman”(video in Russian).
Ingredients
Flour, salt, and egg for laghman dough – or buy premade flour noodles
Lamb or beef meat – diced in small pieces
Bell pepper – diced
Tomato paste, 1-2 tablespoons
Onion – diced
Garlic – diced
Salt
Red pepper powder
White pepper powder
Paprika
Chinese black vinegar (e.g. Chinkiang vinegar)
Soy sauce
Cilantro – chopped
3-4 eggs (for omelette), beaten
Directions
1. Make the laghman noodles following the directions in the previous post. Boil in salted water until done, then rinse and plate.
2. Prepare the omelette in a separate pan: fry the beaten eggs in oil until solid, turn and fry a bit more on other side. Cut the omelette into slices.
3. Over high heat, stir-fry the lamb pieces in a heated wok until lightly browned.
4. Add in the onion and cook until soft and translucent.
5. Add the garlic and a bit of cilantro, cook this until the garlic is fragrant.
6. Add in the tomato paste, cooking it for a bit first, and mix well.
7. Add some water or bouillon to make a sauce. Turn the heat down to medium. Add in the bell peppers and cook for a bit.
8. Add salt, white pepper, red pepper, and paprika. Let everything cook and the sauce reduce for a bit.
9. Add a dash of soy sauce and black vinegar. Add in the cilantro.
10. Finished! Top the noodles with sauce and omelette slices.
I first tasted durap at the night market in Turpan. Sweet, cool, tangy, and refreshing, it was like no other yogurt I’d had before. It’s thin yogurt served over shaved ice and sweetened with sugar or honey. Some people also call this “doogh”, though in other countries that word refers to a saltier yogurt drink.
The stand where I first tried durap.
Many years later, having discovered kefir, I realized how similar it was to durap. You can make something that tastes very similar at home. Just mix some plain kefir together with sugar or honey, then pour over shaved ice in a bowl. In the US, Trader Joe’s stocks a great plain kefir, and Lifeway brand is fairly easy to find in groceries.
My version of Uyghur nan bread, with nigella and sesame. The bread stamp gives it the nice patterns.Uyghur nan bread made without a bread stamp.
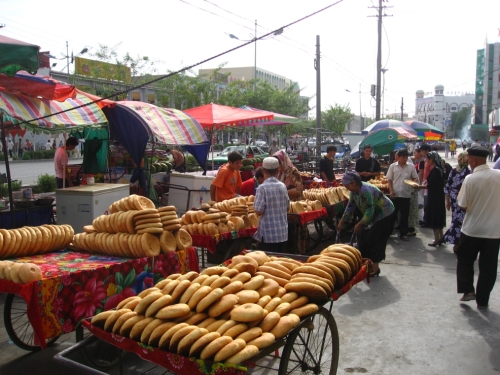
My quest for perfect Uyghur nan bread is still ongoing. In the seven years since I was in Xinjiang, I have never eaten anything like the freshly baked nan bread sold in the streets. Of course, there are countless different varieties of bread being sold – but my favorite was the big, disc-shaped bread. Thick around the edges and thin in the middle, slightly oily and usually topped with sesame and sometimes onion or other spices, it is sold on the street in every city in Xinjiang for only 1-2 kuai.
Selling Uyghur bread in Kashgar.
I’ve eaten at several Uighur, Uzbek, and other Central Asian restaurants in the US since then and I’ve never found it. They serve a bread called лепёшка(lepyoshka) in Russian that is thick and bready, but nothing even resembling the big disc bread.
“Lepyoshka” bread from Cafe Kashkar, an Uyghur restaurant in Brighton Beach.
The big oily round bread is not the only type of bread in Xinjiang. One other variety is a big, round, thick, extremely dry bread that can be stored for a long time. Other nationalities in the region (like Kyrgyz, Kazakhs) make this bread too. I remember visiting a Kyrgyz yurt where the hosts kept a big partially eaten round of dry bread in the corner covered with some cloth. They took it out and served it to us with tea. This bread is usually eaten with soup, sauce, or other liquid as it is too dry to eat on its own. Yet another common variety resembles a bagel, or more precisely, a bialy. We’ll cover this variant in part 2.
Various types of Uyghur bread being sold in Turpan.Baking Uyghur “bagels” in Kashgar.
My own attempts have been getting better after many tries and many burned or misshapen breads. I’ve gotten good results with a pizza stone, but I suspect the perfect nan bread requires a tandoor oven. FarWestChina has a good post and video about how Uyghur bread is made in Xinjiang.
Before buying some bread stamps in Uzbekistan for cheap ($2-3 for each one), I bought an Uyghur bread stamp from Taobao – just do a search for 囊戳子 and you’ll find plenty of them. You can sometimes find bread stamps on Ebay or Etsy as well. The stamp certainly helps give the bread the right look, but I have used a fork plenty of times with decent results. Finally, in New York, Fortuna grocery in Brooklyn sells bread stamps (they keep them behind the cashiers where they sell plates and teapots).
My Uyghur bread stamp.
This bread tastes good by itself and especially with soup or sauce (like dimlama or dapanji). I also like eating it for breakfast with kefir or yogurt.
Ingredients Flour (experiment with all purpose or bread flour, they will give different results)
Egg (optional)
Warm water. Ratio of flour to water by volume: 3 to 1. By weight: 1.5:1.
Yeast
Salt
Sugar
Directions 1. In a large bowl, make a mountain of flour and indent the middle. Pour warm water into the middle, add 1/3-1/2 packet of dry yeast and a bit of sugar. Mix well and let stand for a few minutes. When it has gotten frothy, add the salt and the egg in. Then mix everything well, adding water as needed.
2. When everything is well mixed, flour a surface and knead the dough for 10 minutes until it no longer sticks to your hands.
3. Lightly oil a bowl and put the kneaded dough ball in, cover with a cloth and let rest for at least 40 minutes in a warm place.
4. When the dough has finished resting, punch it down and knead it a bit more. You will have to eyeball how much dough you want to use for how big/thick you want your bread.
5. Roll the dough out into a round, flat circle. It should not be too thick or too thin, maybe a bit less than 1cm thick. Do not let the dough get too thin, or it will burn when you bake it! Let the dough rest for another 20 minutes.
6. Form an edge all around the bread with your hands. If you’ve rested the dough for long enough, it should mold easily without resistance.
7. Time to stamp down the center. If you have a bread stamp, stamp concentric patterns all around the center, making sure to press hard so the spikes go all the way through. If you don’t have a bread stamp, use a bottle or other round object to stamp around the center. Then use a fork to poke holes, poking all the way through. There should be holes all over the center. This helps prevent the center of the bread from rising up (we only want the edges to rise in the oven).
8. Lightly brush oil all over the top and sides of the bread. Then put the toppings onto the center, pressing in lightly so they stick. I usually use sesame and nigella seeds, sometimes with very finely diced onion. Some people also put black pepper and/or cumin seeds. Experiment with what you like; there is no fixed recipe.
10. Ready to bake. Put the dough into your 500F preheated oven (I use a pizza stone) and bake until the bread is golden brown all over (10-15 minutes). If you like, you can lightly brush the bread with oil after it is baked. Enjoy!
Laghman noodles have a special place in my heart. If you go to Xinjiang, chances are you will eat lagman noodles – not only once, but many times, and maybe even every day. In fact, I’m pretty sure there were days I ate lagman more than once in a single day.
Laghman is probably one of the most Uyghur of Central Asian foods – while foods like kebab, plov, and naan can be claimed by many nationalities, noodles are an Uyghur specialty. The etymology of “laghman” is open to debate, but most agree it originally comes from Chinese 拉面(la mian), or literally “pulled noodles.” Hand-pulled Uighur noodles are a wondrous thing – thick with a nice bouncy chew to them.
Laghman, as served in an Uyghur restaurant in Bishkek.
There are as many different varieties of laghman as there are people making laghman, because there is no fixed recipe. It is noodles topped with a sauce of meat and vegetables. Basically anything is game – lamb, beef, chicken, green beans, bell pepper, bok choy, squash – whatever fresh vegetables are on hand. However, there are a few common points: onion, garlic, tomato sauce, and bell pepper are almost always present.
“Dapanji”(stewed chicken with potatoes) laghman served in a cafe in Niya, a town on the very southern edge of the Taklamakan desert.
I have tried for a long time to recreate the taste of laghman noodles in Xinjiang. It is possible that after 7 years my memories of the taste have faded. So far, this is the closest version I’ve made.
This recipe is adopted from Abdulaziz Salavat’s videos (making the noodles and making the sauce). Uyghurs make pulled noodles differently from Chinese (who generally use the folding method, and use flour instead of oil to keep it from sticking). Abdulaziz, an experienced chef, makes noodle pulling look easy, but it is actually quite difficult. His noodles are made by rolling the dough with one hand and pulling with the other. However, if your technique or dough are off, your noodles will be uneven, too thick, or break off.
Uyghur-style laghman as served in a restaurant in Bukhara.
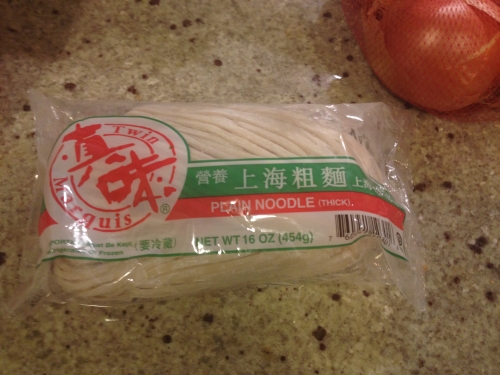
If you don’t want to pull noodles by hand, you can eat this dish with fresh flour-and-water noodles sold in Asian groceries. I make it this way for quick weeknight meals (making noodles by hand is a lengthy process). In NYC, I buy the Twin Marquis thick noodles sold at Hong Kong Supermarket or other Chinese groceries. They are a decent substitute for hand-pulled noodles, although the taste is a bit different. If nothing else is available, you could use udon noodles, but they aren’t the right shape/texture.
Ingredients
Noodles:
Flour
Salt
Egg
Oil
(or buy fresh premade noodles) Sauce: Meat (lamb or beef)
Onion
Tomatoes
Garlic
Chinese celery (or regular Western celery in a pinch)
Tomato paste
Chili paste – I use the chili garlic sauce commonly sold at Asian groceries.
Salt
Soy sauce
Chinese black vinegar
Fresh vegetables – Bell pepper, green beans, bok choy (just the white part, not the leaves). Feel free to substitute with whatever is fresh, although bell pepper at a minimum is a must.
White pepper
Sichuan pepper (“hua jiao”) – optional, but gives a unique flavor
Directions
Noodle Making: 1. Make a dough of flour, salt, water, and egg, kneading well for 10-15 minutes. Then let it rest covered for 30min-1hr, making sure the dough does not dry out. After resting it, form it into a rectangular shape about 1cm thick and lightly brush with oil.
You might wonder about the point of resting dough with no yeast in it. It makes the dough easier to roll and stretch out later. Dough that is not rested tends to be resistant to shaping and difficult to work with.
2. Cut the dough into long pieces and roll them into a smooth cylindrical shape. You want these cylinders to be as smooth and regular as possible, because they will be stretched out into noodles and any imperfections will be magnified. Lightly oil a large round plate. Starting from the center, spiral the dough pieces over the entire plate. Lightly brush the coiled dough with oil. Then let these sit in the fridge covered in plastic wrap for at least 5-10 minutes.
What is the purpose of the magic coil? After making laghman many times, I’ve concluded that it 1) Gives the initial round shape to the noodles, to be pulled out later, and 2) allows you to oil them all at once, which is important so they don’t stick later, and 3) allows you to conveniently store them in a stable state that won’t easily dry out.
3. In this step I recommend you keep the dough coil in the fridge covered and work piece by piece, so the dough doesn’t dry out. Take a dough piece and roll it between your fingers to round out any uneven spots. Pull out the noodle piece and make it into a loop, holding both ends in one hand. Dangling the dough down from the ends, spin the bottom so it twirls up and braids itself. Then holding both ends again, pull it out, waving it up and down, and smacking it against the table. Fold the dough over on itself again and repeat the twirling and pulling. The noodles should be pretty thin by now – cut them so they’re a reasonable length and untwirl them. Don’t worry if they seem too thin, as they will swell up when you cook them.
Don’t fret if you end up breaking some noodles in the process – after they’re cooked you won’t notice much how long the pieces are. However, if your dough is constantly breaking, it could be mean that it wasn’t kneaded enough to begin with. After the noodles are finished, either cook them immediately or cover them with plastic wrap and store in the fridge – you don’t want them to dry out.
4. Bring water to a rolling boil in a cauldron and lightly salt. Put in the noodles – don’t worry if it appears like they have stuck together in a mass of dough. If the dough was oiled correctly in previous steps, they will come apart. Poke with some chopsticks to separate out the noodles as they cook. After the water has returned to a rolling boil for a few minutes, taste a noodle – it should be al dente with a nice firmness to it – drain the noodles and rinse them with cold water in a sieve. Plate the cooked noodles and keep them aside for the sauce.
Making Sauce
Prep: Slice the onions into half moons. Dice the garlic and celery leaves. Dice the tomatoes. Chop all the fresh vegetables into squares. Cut off the ends of the green beans and cut them into fairly small pieces (maybe 1/2 inch long). Optionally, marinate the meat with corn starch and soy sauce – this can help make it more tender. 1. Heat the wok to high heat, heat oil, then stir fry the meat over high heat. You will cook everything on high heat in one go. After the meat is nicely browned, add onions, cook till soft and golden brown, then add a splash of black vinegar.
2. Add 2-3 big spoons of tomato paste and 1 spoon of chili garlic paste, mixing everything well.
3. Add the celery, tomatoes, bok choi, bell pepper, green beans, and any other vegetables you want to add. Stir a bit after adding each vegetable.
4. Add some water or broth to make a sauce. After the water starts to boil, reduce to a simmer and put the meat back in if you removed it earlier. Add vinegar, soy, Sichuan pepper, and salt to taste. Finish it all off with some garlic, mix, and simmer a bit.
5. Dish the sauce over the cooked laghman noodles. Enjoy!