Uzbek Plov / Lamb Rice Pilaf in Instant Pot


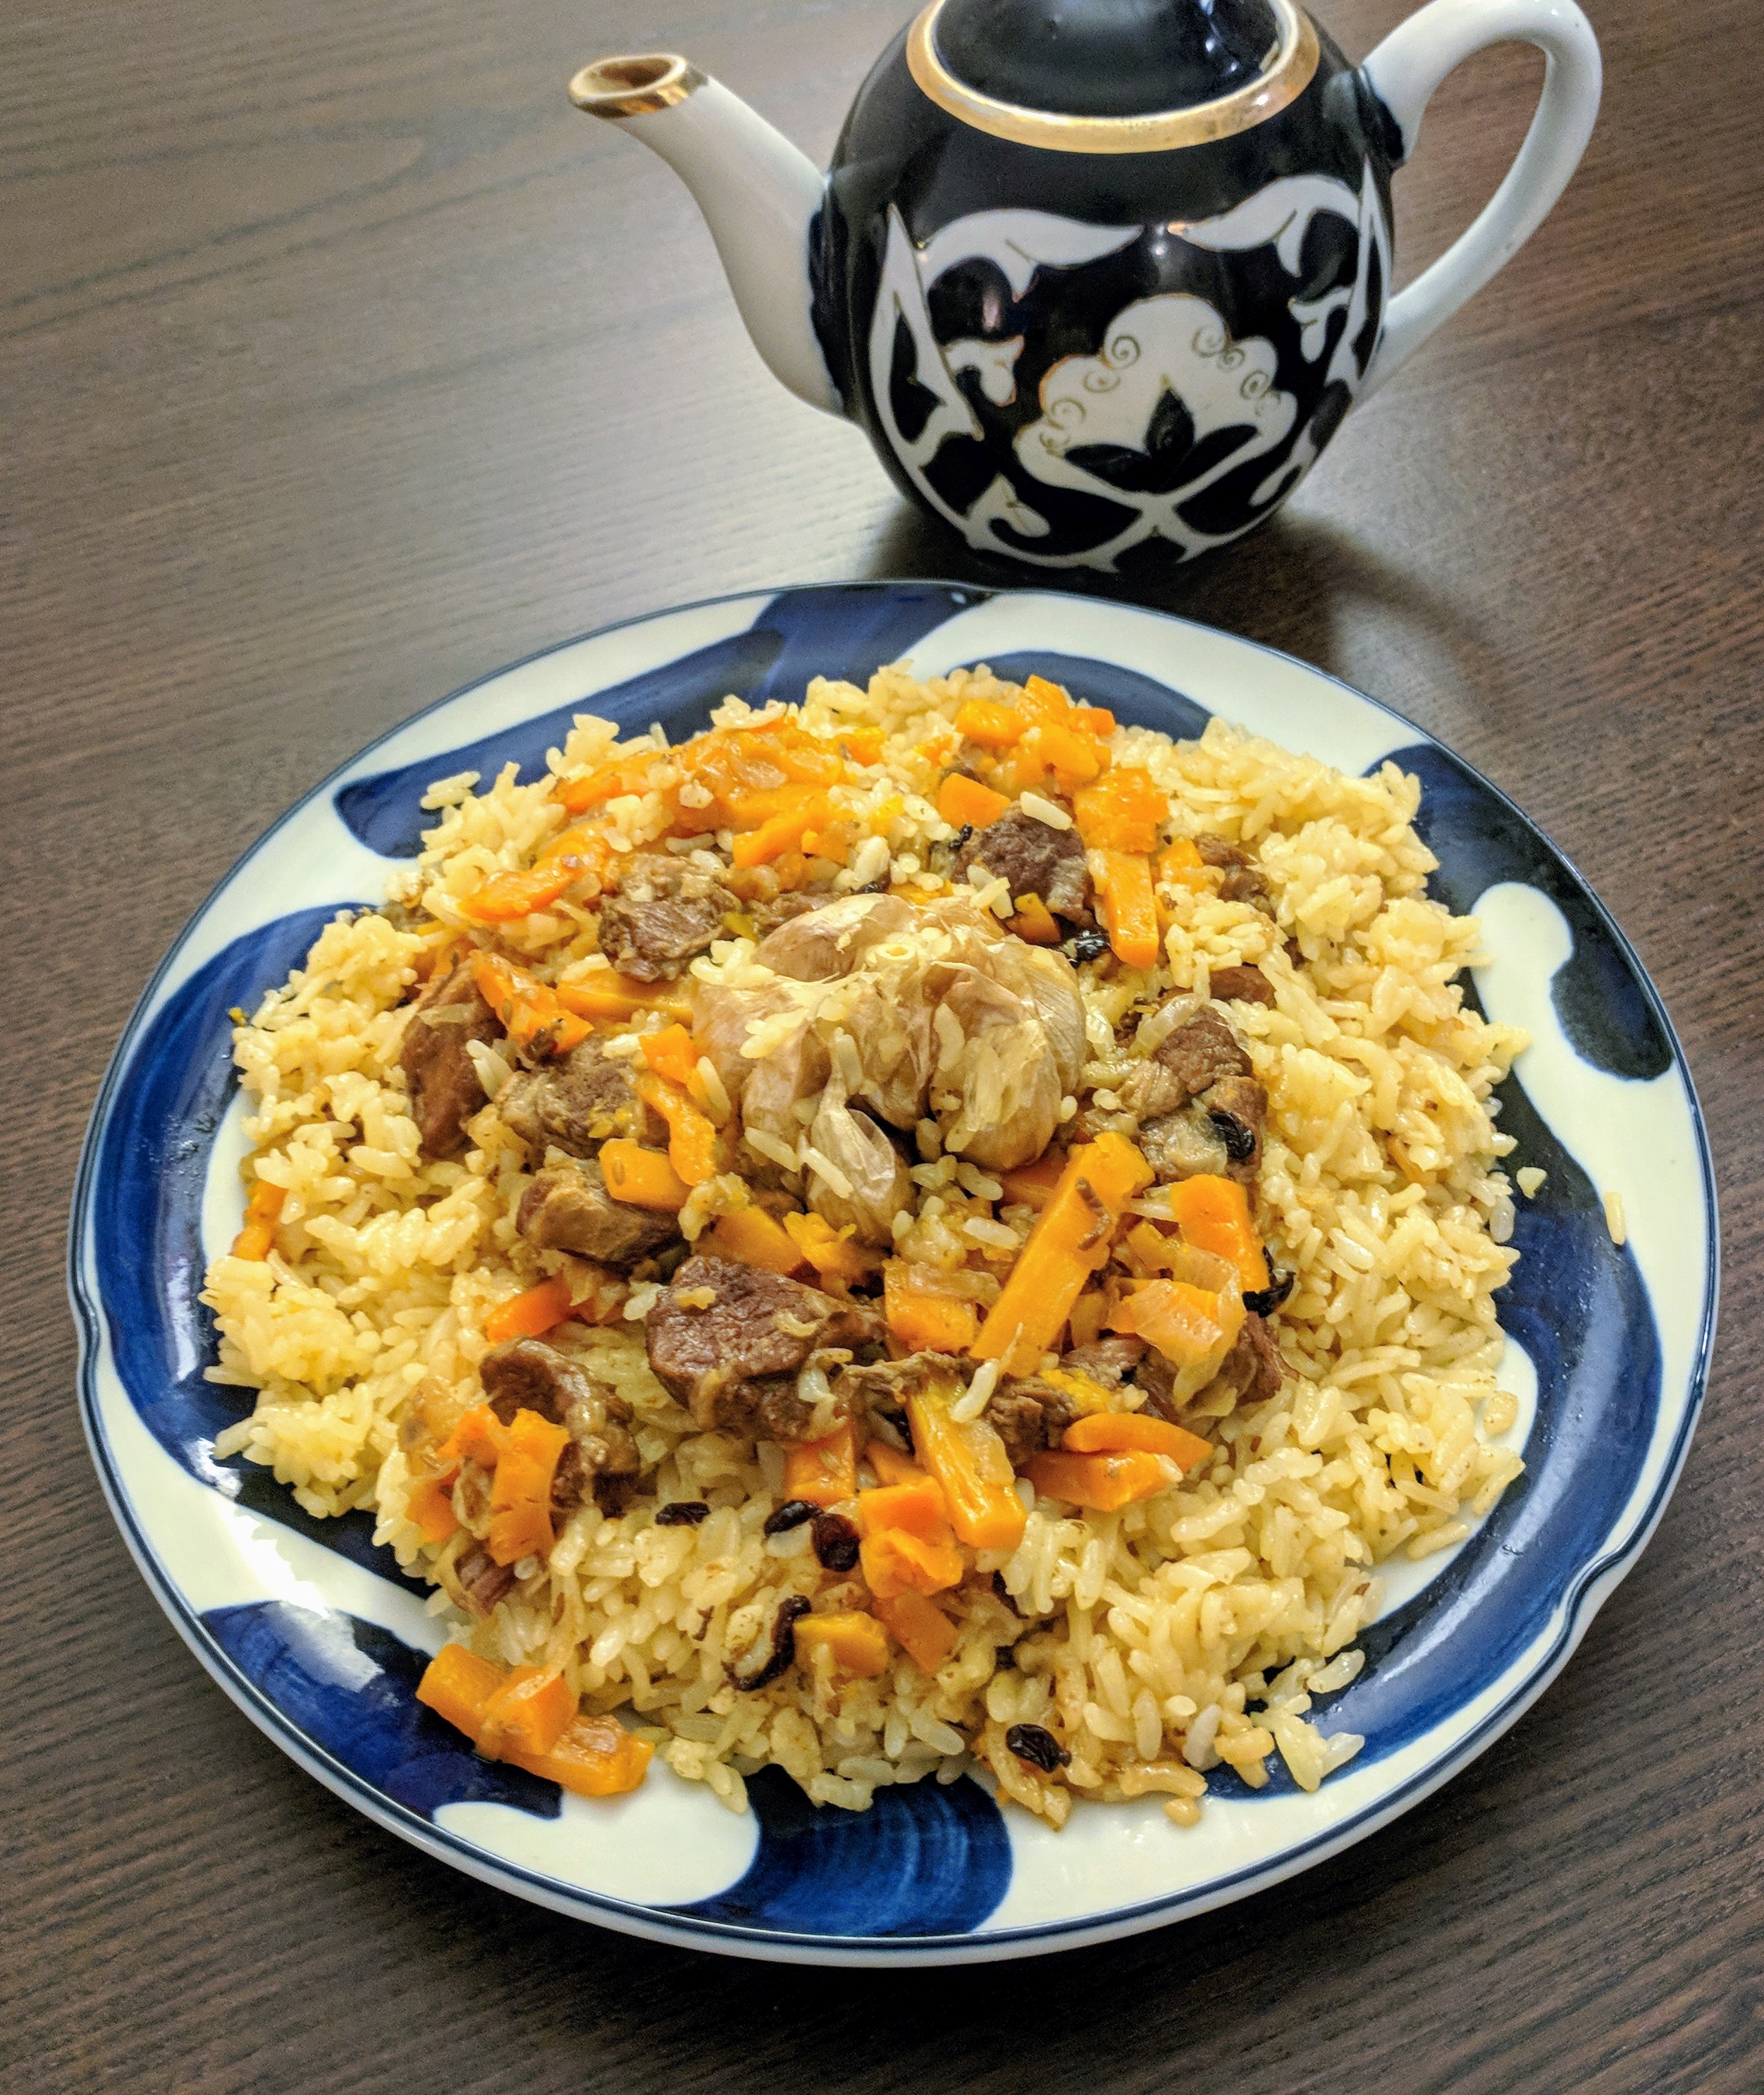
My version of Uzbek plov, cooked in an Instant Pot.

Plov in an Instant Pot instead of a kazan? Isn’t that sacrilege? Possibly. But I’ve discovered that cooking plov in an Instant Pot or electronic pressure cooker is faster, easier, tastes just as good as cooking in a kazan (dare I say it, maybe even better), and most importantly – the results are consistently repeatable!

Ingredients (4 portions)
600 mL of rice (about 500 grams) – long discussion of rice type in the original plov post, but long story short – don’t use East Asian varieties of rice, use a round, medium or long grain rice – e.g. risotto rice, paella rice, Turkish baldo rice, and in a pinch you could use basmati. I use Turkish baldo rice, (Amazon link). They also sell it at Kalustyan’s in NYC.
Water – see below for amount
0.5 lb lamb meat
Small piece of lamb fat, chopped into small pieces (optional)
Vegetable oil – canola or peanut (I prefer peanut, it tastes better)
3 medium-sized carrots, sliced into sticks 5-6cm long and 0.5×0.5cm thick
1 medium to large onion, sliced into half-moons
1 small onion, halved (optional)
Cumin seed, roughly ground in mortar and pestle
Salt
Garlic head
A few dried or fresh chili peppers
Barberries (optional) – they add a nice sour flavor. You can find these at Kalustyan’s.

Time budget: 30 mins prep, 15 minutes sauteing, 15 minutes pressure cook + 10 depressurize, 5 minutes pressure cook + 10 depressurize, 20 minutes steaming = roughly 2 hours

How much water to use and how to rinse the rice
The right water to rice ratio is 1:1 by volume, or 1.2:1 by weight. Make sure to account for water sticking to your rice after you rinse it. Example process:
1. Weigh the dry rice, find it is 500g
2. Rinse the rice
3. Weigh the rinsed rice, find it now weighs 700g
4. Calculate needed water = 1.2 * 500  = 600g
5. But there is 200g of water stuck on the rice, so we only need extra 400g of water. Measure this out and set aside.

Instructions
1. Put the instant pot on ‘saute’ mode and put in the lamb fat pieces. Let them fry until they have released most of their fat and only the cracklings are left. Remove the cracklings (they make a nice snack). Skip this step if you don’t have any lamb fat.

2. Pour some vegetable oil in, enough to coat the bottom of the pot (if you put enough fat in from step 1, you might not need any). Then put your small onion in, and roll it around in the oil, letting it fry until slightly brown on the outside, then remove the onion and discard it. People do this because they claim that the onion ‘absorbs’ the bad taste of the vegetable oil. I just do it for the sake of tradition, but you can probably skip it if you want.

3. Put in the onion slices and let these fry 5-10 min until they are a nice brownish color – they don’t need to be caramelized.

4. Put the meat in and fry it for a minute until it’s lightly browned on the outside – do not go overboard in cooking it since we are going to pressure cook it. It should still be raw and soft at this stage.

5. Put the carrots in along with a pinch or two of cumin seed and mix everything up. Cook the carrots for a while until they start to brown.

6. Pour in the water you set aside (explained above). Put a pinch or two of salt in, the chili peppers, and stir everything. Before you put the lid on, make sure nothing is sticking to the bottom of the pot. Close the instant pot lid, set the vent to ‘Seal’, and set the Meat/Stew setting for 15 minutes. You will notice a garlic in the photo, but actually it is better to put it in later (it will disintegrate if you put it in now).

7. After the 15 minutes are up, let it sit for 10 minutes. Open the lid and put the barberries in. Then quick release the pressure and place the rinsed rice in an even layer ON TOP of the other ingredients – DO NOT MIX. You want the rice layer to be as flat and even as possible. You can put in the garlic head if you didn’t in step 7 (bury it in the middle of the rice). Then again close the lid, set the vent to ‘Seal’, and set the ‘Pressure Cook’ setting for 5 minutes.

8. After the 5 minutes are up, let it sit for 10 minutes, then quick release the pressure. Fluff up the rice a bit with a fork to help the grains separate, and let the rice cool down and firm up for a bit before you plate it.

10. The plov is ready! Plate it with the rice on bottom, meat/carrots on top, and garlic in the middle. The rice grains should be individual and slightly chewy, though cooked through – ‘al dente’.

Summary:
Measure out the rice by weight, and target 1.2x that much in water. Rinse the rice, weigh it, and determine the remaining amount of water needed. Keep the water aside.
1. Prepare the oil/fat
2. Saute the onions until brownish
3. Brown the meat
4. Put in the carrots and cumin
5. Put in the water, put in salt, chilis
6. Meat/stew setting for 15 minutes, release pressure after 10 minutes
7. Put rice in an even, flat layer on top, put barberries, put garlic
8. Pressure cook on high for 5 minutes, release pressure after 10 minutes

How to make fluffy basmati rice like in Indian restaurants

Persian style rice with barberries.

Today’s post is all about how to make fluffy basmati rice like you may have tried in Indian or Persian restaurants. This style of rice cooking is used to make plov/chelow/polow/pulao in Iran, Azerbaijan, and the Indian subcontinent. Unlike the method used for Uzbek plov where the rice is cooked together with other ingredients and absorbs the broth, in the “drain and steam” method, the rice is cooked by itself, drained, then steamed. This ensures fluffy rice and individual grains that don’t stick to each other. We’ll go over specific recipes with this rice, like Hyderabadi biryani or Azeri plov, in another post.

azeriplov2
Azeri style plov with kazmakh (Persians call it ‘tah-dig’) – the crispy rice at the bottom of the pot.

For a long time, I would buy basmati rice in the store, cook it, and find it tasted nothing like the fluffy rice in Indian restaurants. The secret to making perfectly fluffy basmati rice is 1) using a high quality rice, 2) draining and 3) steaming.

Importantly, a rice cooker will NOT make fluffy basmati rice! Rice cookers are pretty much only for making Asian varieties of rice which are eaten somewhat sticky. If you use a rice cooker to make basmati rice, it will probably come out kind of sticky or mushy, and it won’t resemble the rice in Indian restaurants.

Secondly, sometimes people recommend the “absorption” technique where you boil the rice in the correct amount of water then cover it and let it “absorb” the water and steam until fully cooked. That method works fine only if you cook the exact same type of rice and the exact same amount of rice every time under the exact same conditions, and is best only for cooking small amounts. It is highly prone to error and can result in overcooked or undercooked rice if you get the amount of water wrong. To achieve perfectly fluffy rice every time for any amount of rice, use the drain and steam method explained below. However, sometimes a recipe will call for the absorption method because the rice is being flavored by the broth (e.g. Saudi kabsa). We’ll address the fine points of that method in a later post.

Regular basmati rice.
sella
“Sella” basmati rice. Notice how it is a bit yellowish and translucent.

I use two types of basmati rice: the regular kind (e.g. Tilda brand) and the “sella” (sometimes called “sela”) kind. Regular basmati rice is the best type to eat plain with curries, and has a nice aroma to it – but it is rather delicate and the grains can break easily, so you must be very careful with it when cooking. “Sella” rice is good to use for biryanis. It is parboiled, giving it a yellowish translucent color, and making it very resilient and non-sticky. It is nearly impossible to cook it wrong. The downside of “sella” rice is that it does not absorb flavors that well and is a bit rubbery tasting compared to the delicate regular basmati rice. If you have never cooked rice like this before, I recommend starting with “sella” as it is a bit more forgiving. Kalustyan’s in NYC sells both varieties.

Whatever kind you buy, make sure it is a high quality brand, rather than a generic “basmati” rice you find in the store.

Process:
1)Wash your basmati rice several times until the water runs clear. Then soak the rice for 20-30 minutes. Drain the rice after you are done soaking it.

2)Pour water over the rice until 2-3 inches of water cover the rice. Add salt and oil to taste. If you are making Indian style rice, you can put in cardamom, bay leaf, and other whole spices as you like. Set this on high heat until you get a rolling boil.
rice_cooking

3)Let the rice cook in the boiling water for a few minutes, sampling a rice grain every now and then. The rice needs to taste 70-80% done – a bit crunchy, but nearly edible.

4)Quickly, drain the rice in a colander. Do not let it sit in the colander long, otherwise it will start to clump up!
rice_draining

For Azeri or Persian rice, you may want to make a kazmakh(Azeri) or tah-dig(Persian) – the rice that turns crispy from touching the pot. Getting this right will involve trial and error and most likely it will just stick to the pot without coming off cleanly. Mix some yogurt and egg in a bowl, and add some of the mixed rice. The mixture should be mostly rice, and not too liquid.

You can also make a saffron infusion to add color and flavor (if you just want the yellow color, turmeric will give the same effect and is much cheaper). Just grind up some saffron stalks and mix with hot water.
saffron

5)Now we start the steaming phase, but don’t turn the heat on for now. Ready an empty pot – a kazan works best if you have one, but just use a regular pot otherwise (don’t use a wok!). If you made a kazmakh or tah-dig, spread it in a layer over the bottom of your pot. Then put the drained rice into the pot, and form it into a mountain. If making Azeri or Persian rice, you can drizzle some saffron-infused water over it.
basmati_ready_to_be_cooked

6)Now you need to bundle up your pot so the steam can stay inside. Put clean cloth towels between the lid and the pot, and close tightly (paper towels can do in a pinch if you don’t have any towels lying about). Weigh down the lid with a bowl or other heavy object – we don’t want any steam to escape.
steam_rice

7)Now turn the heat to medium and let the rice pot warm up for about 5 minutes. Then turn this to minimum heat, and let it steam for at least 20 minutes, ideally 30 minutes or even longer. More steaming = fluffier rice.

8)If making Azeri rice, you can open up the pot after 15-20 minutes, put a big slab of butter in the middle of your mountain, then wrap it up again and let it steam for another 20-30 minutes.
butter_in_rice

9)When you are done steaming, turn off the heat and let it sit covered for another 5 minutes. Then open the lid (being careful not to burn yourself on the escaping steam) and fluff up the rice a bit with a fork. Let it sit uncovered for another few minutes so the rice can cool down and firm up. For Indian rice, you may want to add a touch more oil after the rice is done cooking and mix well. If you made a kazmakh/tah-dig, pry it out with a knife and serve it with the rice.

basmati_with_butterchicken
Butter chicken served with basmati rice.

Mastava: Uzbek rice soup

Mastava w bread
Mastava with Uzbek nan bread.

This is one of my favorite soups and it’s very easy to make. Mastava is a thick, hearty soup of rice, meat, potatoes, and other vegetables, served with a dollop of sour cream. Like many Central Asian soups, it is first “fried”, then water is added to make it into a soup.

Don’t worry about the exact proportions of the ingredients, just make sure you don’t put in so many things that it doesn’t fit in your pot! You can add in whatever other vegetables you have on hand. It’s a good dish to make a big batch of on weekends if you are too busy to cook during the week, or happen to have a lot of vegetables on hand. It stores well and tastes even better the next day.

Uzbek nan
I made this Uzbek-style nan bread to eat with the soup. The recipe is very similar to the Uyghur nan bread I posted earlier, although there are some slight differences. The Uzbek nan is generally softer and thicker. I’ll do another post on it soon.

This recipe is from Восточный Пир by Hakim Ganiev.

Ingredients
Meat (beef or lamb) diced into cubes
Onion, diced
Garlic, diced
Carrots, diced into cubes
Potatoes, diced into cubes
Bell peppers, diced into cubes
Tomatoes, diced into cubes
Rice (only a handful, soaked in warm water for 20 minutes) – you can just use regular rice for this as it will get soggy in the soup
Tomato paste
Salt
Cumin
Black pepper
Sour cream (garnish), or smetana if you have it
Cilantro (garnish)
ingredients

Directions
1. Sautee the onions in oil, on high heat, until they are slightly translucent and golden. Add the meat and garlic and sautee.
meat and onions

2. When the meat is browned, add in the carrots and bell peppers. Cook this for a few minutes on medium heat.
cook vegetables

3. Add in a few big spoonfuls of tomato paste and mix well. Add the tomatoes. Mix everything well and cook for a bit.

4. Add the potatoes, salt, and spices (ground cumin, black pepper). Cook for a few minutes.
add potatoes

5. Pour in cold water until you have as much soup as you want. It will be a fairly thick soup in the end.
add water

6. Turn the heat to high until the water has just started to boil. Then turn to minimum heat and let it simmer for 15 minutes.

7. Add in the rice and let it simmer for another 10-15 minutes until the rice is soft.
soup ready

8. Salt to taste. The soup is done! Serve with a spoonful of sour cream and chopped cilantro.
mastava2

Ajapsandali – Georgian stewed vegetables

ajap1
Adjapsandali with khachapuri (cheese bread).

Taking a break from the meat-heavy dishes on this blog, here is a Georgian vegetable stew that’s very simple to make. I cooked it the other day together with some cheese bread, and didn’t even notice I was eating a vegetarian meal!

This recipe is from Практическая энциклопедия грузинской кухни (A practical encyclopedia of Georgian cuisine) by Elena Kiladze. 

Ingredients
Eggplant (1 large)
Potato (2 medium)
Tomatoes (3 medium)
Onion (1 medium)
Cilantro
Basil
Parsley (optional)
Dill (optional)
Garlic
Salt
Red pepper powder
Black pepper

1. Cut the eggplant and potatoes into half circles, the onions into half rings, and the tomatoes into quarters. Finely mince the garlic and greens.
2. Fry the onions over medium heat until they are golden brown, then add the potatoes and fry these for another 2-3 minutes.
step1

3. Add the eggplants and tomatoes, cook for 5 minutes, stirring from time to time.
step2
4. Pour in 1/3 cup of water, turn down the heat to minimum, then cover the pot and cook for 15 minutes, stirring occasionally, until the potatoes and eggplants are soft.
5. Add the garlic, greens, salt, pepper, and mix well. Turn off the heat and let sit covered for some time. Enjoy!
step3

Basma: Uzbek Slow-cooked Lamb Stew

dimlama5
My version of basma, with nan bread.

Basma is an incredibly simple dish to prepare with amazing results: tender, juicy, lamb meat that practically melts in your mouth, in a rich vegetable broth with plenty of soft carrots and potatoes. It’s crowned with a few heads of garlic cooked whole: the garlic cloves fall right out of the skin and are so soft they’re almost like a puree. And yet this dish requires nothing more than 1) cutting vegetables and 2) time. To be sure, it involves a lot of vegetable cutting. And it takes almost 2 hours to cook after the prep is done. But the result is well worth it.

Newnan5
Nan bread is great for soaking up the dimlama broth. Recipe here.

This dish comes from Uzbekistan and goes by a few different names: basma and dimlama/dumlama. According to Stalic, basma refers to this version, where everything is put into a cold kazan and then steamed, while dimlama refers to a similar dish where everything is fried before steaming.

This recipe comes from Stalic Khankishiev with some minor alterations (video here). Abdulaziz Salavat has a video recipe for basma (he calls it dimlama) as well.

Ingredients:
Lamb – I used 2 lbs of lamb shoulder chops in the pictures. The cooking time will depend on how tender your meat is.
Onions – 2
Potatoes – 4-5
Carrots – 3-4
Tomatoes – 3-4
Bell peppers – 2
Cabbage – 1 head of cabbage
Garlic – 2 heads of garlic
Salt
Cumin seeds
White pepper
Paprika
Basil or cilantro or other fresh green herbs
Chili pepper (fresh) – 1 (optional)
Dried chili peppers (optional)
Eggplant (entirely optional, I didn’t think it added anything)

Directions
1. Chop all the vegetables: cut the potatoes into halves or quarters; slice the onions thinly; cut the carrots into discs; cut the bell pepper into slices; cut the tomato into quarters; peel off several whole leaves from the cabbage and set aside, then chop the cabbage into thick slices; chop the eggplant. Cut the lamb into medium/large pieces, making sure to leave some fat on the meat. Roughly grind the cumin seeds.
ingredients

2. Through the entire layering process, the heat is turned off. Pour some oil to cover the bottom of the wok, then place the meat in. Make sure the meat is sitting in oil and not directly on the metal surface. Put salt, cumin seed, white pepper, and paprika on the meat.
meat

3. Scatter the onions all over the top of the meat to make another layer. Salt the onions.
onions

4. Put the tomato pieces on top of the onions.
tomatoes

5. Put the carrot slices on top of the tomatoes, then the bell pepper slices. Put the whole fresh chili pepper and some dried chili peppers. Place the heads of garlic, digging them in a bit so they don’t fall off the pile.
carrots

6. Place the potato pieces on top.
potatoes

7. Place the chopped cabbage pieces on top of the potatoes, and repeat the seasoning from step 2: salt, cumin seeds, white pepper, and paprika.
cabbage

8. Put the eggplant and basil leaves at the very top.
greens

9. Using the whole cabbage leaves you set aside, make a dome over everything. This will help keep the steam in.
dome

10. Cover with a lid. If it doesn’t quite fit, weigh the lid down to make sure it is sealed tight. Now the magic begins! Turn the heat up to medium and let it cook for 15 minutes. Then turn the heat to low and let it simmer for at least 1 hour and 30 minutes, longer if you are using tougher meat. Be careful not to turn the heat so low that it stops simmering. When you put your ear to the pot, you should hear a steady bubbling.
cover

After the long wait, when we open the dome and break through the outer layers, we find the inside has turned into a vegetable broth! Plate everything and serve with some bread and hot green tea. Osh bolsin!
finish

dimalama1

Khachapuri: Georgian Cheese Bread

Khachapuri2_2
My version of adjaruli khachapuri.
khachapuri
My version of megruli khachapuri.

Khachapuri is probably the most famous Georgian dish, and for good reason. It is incredibly simple to make and very tasty. If you like cheese and bread, you will love this dish.

There are several different varieties of khachapuri but they are all variations on the same idea: cheese stuffed with bread. Adjaruli is a boat-shaped bread filled with cheese and topped with egg and butter, mixed before serving. Megruli is a round-shaped bread filled with cheese and/or egg, sometimes with cheese on top. If you have enough dough and cheese, you can make both types at the same time.

In Georgia, khachapuri is filled with Georgian cheese, typically suluguni. I use a mix of mozzarella and feta or goat cheese. The idea is a cheese with the consistency and melt of mozzarella but with saltiness and tang. If using goat cheese, I would not use the rind.

This recipe is adopted from BigGeorgeHighlander and also this New York Times recipe for khachapuri (where I got the cheese mix idea).

Ingredients
Flour
Yeast
Salt
Cheese (equal parts mozzarella and feta or goat cheese)
Egg
Butter (optional, for adjaruli)

Directions
1. Make a dough out of flour, warm water, yeast, and salt. Knead this for ten minutes, then rest covered in a warm place for 1 hour.
raised dough

2. Mix your cheeses together with an egg white and a bit of salt depending on how salty your cheeses are. Mix well until you have produced a cheese mix of solid consistency.

cheese1cheese2

For Adjaruli:
3. When your dough has finished resting, take a piece and roll it out into an oblong shape. Not too thick or thin, maybe 1/2 cm thick.
roll dough

4. Roll the long edges of the dough inwards and press the ends together to make the boat shape. Experiment with shapes; some people make a more fat and round shape, some twist the ends together, etc.
shape dough

5. Fill the dough boat with cheese. You can brush the dough with egg yolk if you want the resulting bread to have an extra golden crust.
fill cheese

6. Preheat the oven to 450F. Place the filled dough onto a pan lined with parchment paper or oiled foil. (It may be easier to fill the dough directly on the pan so you don’t need to move it). Bake for 10-15 minutes or until golden brown.

7. Take the bread out, make a small indentation in the middle of the cheese, and crack an egg onto it. Return the pan to the oven and let it bake for a few minutes longer until the egg white has set.
put_egg

8. Cut two slices of butter and stick into the cheese on each side of the egg. Mix everything together well before eating.
khachapuri_mix

For Megruli:
3. When your dough has finished resting, take a piece and roll it out into a round shape. Not too thick or thin, maybe 1/2 cm thick. Place a ball of cheese on top. You can mix the cheese together with egg yolk, but make sure it doesn’t get too runny.
make_round1

4. Fold up the edges of your dough around the ball of cheese.
make_round2

5. Press down to flatten the ball into a round disc of dough. Flip the dough back and forth a couple times to widen out the disc.
make_round3

6. (Optional) Brush the top of the bread with egg yolk and sprinkle some extra cheese on top.
make_round4

7. Rip a little hole in the top of the bread. This is an important step that will prevent the bread from rising up and bursting inside the oven.
make_round5

8. Preheat the oven to 450F. Place the filled dough onto a pan lined with parchment paper or oiled foil. Bake for 10-15 minutes until golden brown.

Enjoy…
khachapuri with chakhokhbili


Khachapuri2

Kutab: Azerbaijani “quesadilla”

Kutab

Kutab (qutab, кутаб) comes from Azerbaijan: a Turkic country on the western shore of the Caspian Sea, formerly part of the Soviet Union. Although they don’t share a border, Azerbaijanis can understand Turkish and vice versa to some extent.

Kutab is a wonderfully simple dish that makes a great brunch: thin dough stuffed with filling and grilled on a saj (or in my case, a frying pan). The filling can be vegetables, cheese, and/or meat; I made mine with cheese and realized how similar it was (at least in concept) to a quesadilla.

This recipe is from Abdulaziz Salavat, video here ( in Russian ).

Ingredients:
Flour
Salt
Oil
Cheese (your preference; I used a mix of mozzarella and feta)
Greens (up to you; I used spring onions and cilantro; dill, basil, or parsley would be nice too)

Directions:
1. Make your filling: mix the cheese, greens, and some oil together in a bowl.

MixCheese

2. Make a dough of flour, water, salt, and oil. It will be easier to roll out the dough if you let it rest for a bit (30min-1hr, covered so it doesn’t dry out). No need if you’re in a hurry, though.

DoughPieces

3. Break the dough into small pieces as above. Lightly oil a piece, then roll it as flat and wide as you can. It should be almost paper-thin and slightly translucent when it is thin enough.

RollDough

4. Spread the filling on one half.

FillDough

5. Fold the dough over and press hard around the filling so the dough seals.

FoldDough

6. Cut a nice round shape out of the dough.

CutDough

7. In a frying pan or on a griddle, grill the kutab on medium heat until the bottom has golden brown spots (should take 3-5 minutes). Flip the kutab over. The other side will get done much more quickly, so be attentive – after 1-2 minutes it should be nice and golden brown. Eat by itself, or with melted butter, sour cream, or yogurt. Enjoy!

Grilling

Kutab2